Introduction to Homemade Chocolate-Covered Ice Cream Bars
There’s something magical about biting into a chocolate-covered ice cream bar. The creamy ice cream, the rich chocolate coating, and the delightful crunch of toppings create a symphony of flavors and textures. Making these treats at home is not only fun but also allows you to customize them to your liking. Whether you prefer classic vanilla or adventurous flavors like mint chocolate chip, the possibilities are endless!
Why You Should Make Homemade Chocolate-Covered Ice Cream Bars
First and foremost, homemade chocolate-covered ice cream bars are incredibly easy to make. With just a few ingredients and simple steps, you can whip up a batch in no time. Plus, you can choose your favorite ice cream flavor, making it a personal treat. This means you can cater to your taste buds or those of your family and friends.
Another reason to make these bars is the joy of creativity. You can experiment with different chocolate coatings, from dark to white chocolate, and add a variety of toppings. Crushed nuts, sprinkles, or even cookie crumbs can elevate your dessert to a whole new level. This flexibility makes them perfect for any occasion, whether it’s a summer barbecue, a birthday party, or just a cozy night in.
Moreover, these homemade treats are a hit with kids and adults alike. They are not only delicious but also a fun activity to do together. Imagine the smiles on your children’s faces as they help dip the bars in chocolate and sprinkle on their favorite toppings. It’s a delightful way to bond and create lasting memories.
In summary, making homemade chocolate-covered ice cream bars is a rewarding experience. You get to enjoy a delicious dessert, unleash your creativity, and share joyful moments with loved ones. So, let’s dive into the ingredients and get started on this delightful journey!
Ingredients for Homemade Chocolate-Covered Ice Cream Bars
Creating your own chocolate-covered ice cream bars is a delightful experience, and it all starts with the right ingredients. Here’s what you’ll need to make these scrumptious treats:
- Ice Cream: Choose your favorite flavor! Classic vanilla, chocolate, or even fruity options like strawberry work wonderfully.
- Chocolate: You can use milk chocolate, dark chocolate, or white chocolate. Each type brings a unique taste to your bars.
- Vegetable Oil: A tablespoon of vegetable oil helps the chocolate melt smoothly and gives it a nice sheen.
- Toppings: Get creative! You can use crushed nuts, sprinkles, cookie crumbs, or even shredded coconut. Choose what you love!
- Popsicle Sticks: These will help you dip and hold your ice cream bars. Wooden sticks work best.
- Wax Paper: This is essential for placing your dipped bars to cool without sticking.
With these ingredients on hand, you’re ready to embark on your chocolate-covered ice cream bar adventure. The best part? You can mix and match flavors and toppings to create a treat that’s uniquely yours. So, gather your supplies, and let’s move on to the next step!
Step-by-Step Preparation of Homemade Chocolate-Covered Ice Cream Bars
Now that you have your ingredients ready, it’s time to dive into the fun part: making your homemade chocolate-covered ice cream bars! Follow these simple steps to create your delicious treats.
Step 1: Choose Your Ice Cream Flavor
The first step is to select your favorite ice cream flavor. You can go classic with vanilla or chocolate, or get adventurous with flavors like cookies and cream, mint chocolate chip, or even mango. The choice is yours! Remember, the flavor you choose will be the star of your ice cream bars, so pick one that excites your taste buds.
Step 2: Prepare the Ice Cream Bars
Once you’ve chosen your ice cream, it’s time to prepare the bars. Start by scooping the ice cream into a rectangular dish or a silicone mold. Make sure to pack it down firmly to avoid air pockets. If you’re using a dish, you can cut the ice cream into bars later. If you’re using molds, insert popsicle sticks into the center of each portion. This will make it easier to dip them later. Place the dish or molds in the freezer for at least 2 hours, or until the ice cream is solid.
Step 3: Melt the Chocolate
While your ice cream is freezing, it’s time to melt the chocolate. You can do this using a microwave or a double boiler. If using a microwave, place the chocolate in a microwave-safe bowl and heat it in 30-second intervals, stirring in between until smooth. If you prefer the double boiler method, fill a pot with water and bring it to a simmer. Place a heatproof bowl on top, making sure it doesn’t touch the water, and add the chocolate. Stir until melted and smooth. Don’t forget to add a tablespoon of vegetable oil to give your chocolate a nice shine!
Step 4: Dip the Ice Cream Bars in Chocolate
Once your ice cream is fully frozen and the chocolate is melted, it’s time to dip! Remove the ice cream bars from the freezer. If you used a dish, cut the ice cream into bars and insert the sticks. Hold each bar by the stick and dip it into the melted chocolate, making sure to coat it evenly. Allow any excess chocolate to drip off before placing the bar on a piece of wax paper.
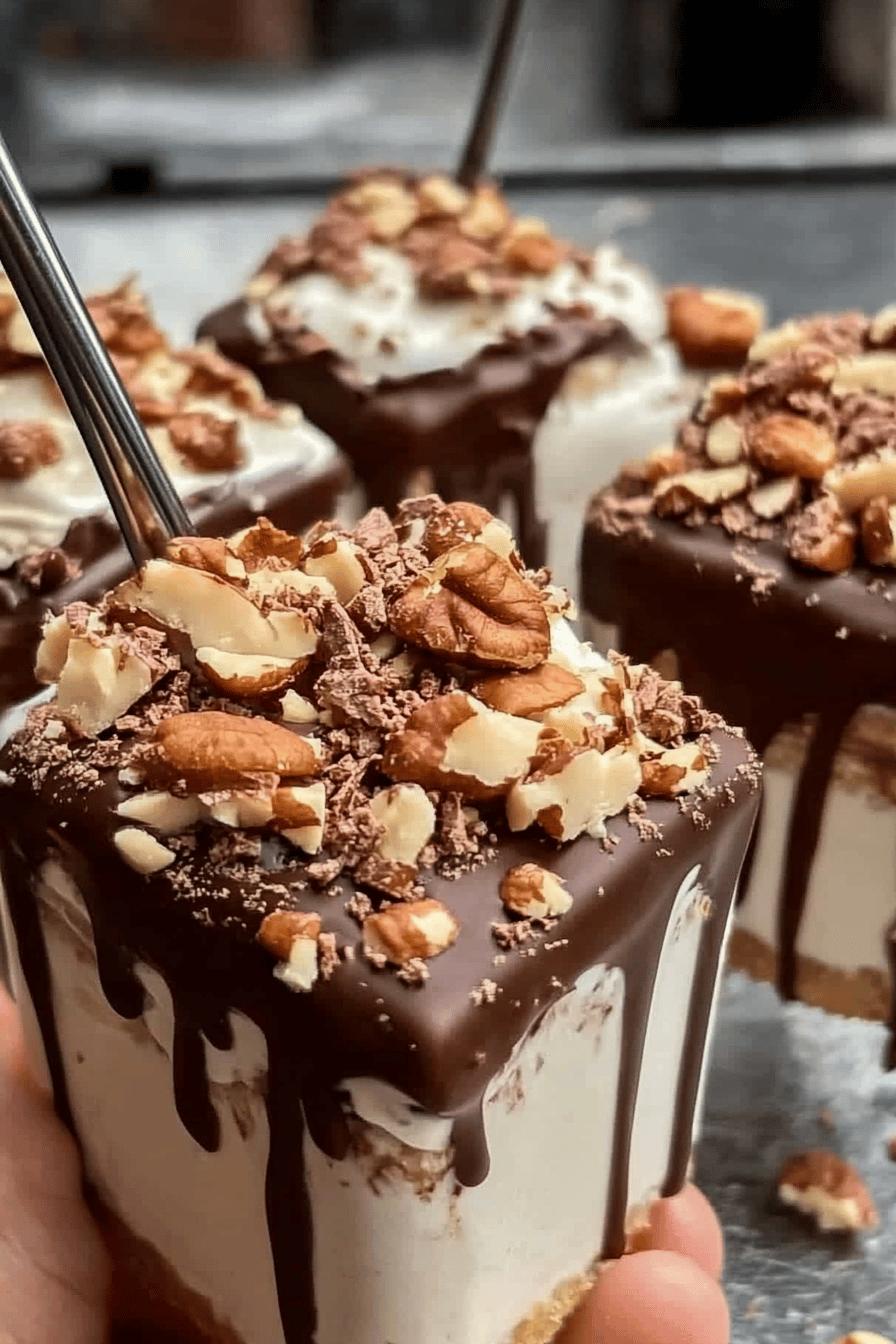
Step 5: Add Toppings to Your Chocolate-Covered Ice Cream Bars
Now comes the fun part—adding toppings! While the chocolate is still wet, sprinkle your favorite toppings over the bars. You can use crushed nuts, colorful sprinkles, cookie crumbs, or even shredded coconut. Get creative and mix different toppings for a unique look and taste. The more, the merrier!
Step 6: Freeze and Serve
After you’ve added the toppings, place the chocolate-covered ice cream bars back in the freezer for about 30 minutes. This will help the chocolate set and harden. Once they’re ready, you can serve them immediately or store them in an airtight container in the freezer for later. Enjoy your homemade chocolate-covered ice cream bars as a delightful treat on a hot day or any time you crave something sweet!
Variations of Homemade Chocolate-Covered Ice Cream Bars
While the classic chocolate-covered ice cream bars are delicious, there’s a whole world of variations waiting for you to explore! By mixing up the ice cream flavors, chocolate coatings, and toppings, you can create a unique treat every time. Let’s dive into some exciting variations that will take your homemade bars to the next level!
Unique Ice Cream Flavors to Try
Why stick to just vanilla or chocolate? Here are some fun and unique ice cream flavors to consider:
- Salted Caramel: The sweet and salty combination is a crowd-pleaser.
- Pistachio: This nutty flavor adds a sophisticated twist.
- Cookies and Cream: A classic favorite with crunchy cookie bits.
- Matcha Green Tea: For a refreshing and earthy taste.
- Peanut Butter Cup: A rich and creamy option for peanut butter lovers.
Feel free to experiment with any flavor that excites you! The more adventurous, the better!
Different Chocolate Coatings
Chocolate is the star of the show, but you can switch things up with different types of chocolate coatings:
- Dark Chocolate: Rich and slightly bitter, perfect for a gourmet touch.
- White Chocolate: Sweet and creamy, it pairs well with fruity flavors.
- Milk Chocolate: The classic choice that everyone loves.
- Carob: A great alternative for those avoiding chocolate.
- Flavored Chocolate: Try adding mint or orange extract to your chocolate for a unique twist.
Mix and match these coatings to find your favorite combination!
Creative Topping Ideas
Toppings can make or break your ice cream bars. Here are some creative ideas to elevate your treats:
- Chopped Nuts: Almonds, walnuts, or pecans add a delightful crunch.
- Mini Marshmallows: For a fun, chewy texture.
- Crushed Candy Bars: Snickers, M&Ms, or Oreos can add a sweet surprise.
- Shredded Coconut: Adds a tropical flair to your bars.
- Edible Glitter: For a festive touch that’s perfect for parties.
Don’t be afraid to mix and match toppings for a fun and colorful presentation!
With these variations, your homemade chocolate-covered ice cream bars will never be boring. Get creative and enjoy the process of making these delightful treats!
Cooking Note for Homemade Chocolate-Covered Ice Cream Bars
When making homemade chocolate-covered ice cream bars, a few cooking notes can help ensure your treats turn out perfectly every time. Here are some essential tips to keep in mind:
- Choose Quality Ingredients: The flavor of your ice cream bars largely depends on the quality of the ingredients you use. Opt for high-quality chocolate and fresh ice cream for the best taste.
- Temperature Matters: Make sure your ice cream is fully frozen before dipping. If it’s too soft, the chocolate won’t adhere properly, and you’ll end up with a messy treat.
- Work Quickly: Once you dip the ice cream bars in chocolate, work quickly to add your toppings. The chocolate can set fast, so you want to ensure your toppings stick before it hardens.
- Use a Deep Bowl for Dipping: A deep bowl for melted chocolate allows you to dip the bars fully without making a mess. This ensures an even coating and a beautiful finish.
- Experiment with Temperatures: If you find the chocolate is too thick for dipping, you can warm it slightly. Conversely, if it’s too runny, let it cool a bit before dipping.
- Keep It Neat: Use a fork or a skewer to help dip the bars. This keeps your hands clean and allows for better control when coating the bars.
- Store Properly: After dipping, store your chocolate-covered ice cream bars in an airtight container in the freezer. This prevents freezer burn and keeps them fresh for longer.
By following these cooking notes, you’ll create delicious and visually appealing chocolate-covered ice cream bars that everyone will love. Enjoy the process and have fun experimenting with flavors and toppings!
Serving Suggestions for Homemade Chocolate-Covered Ice Cream Bars
Once your homemade chocolate-covered ice cream bars are ready, it’s time to think about how to serve them! These delightful treats can be enjoyed in various ways, making them perfect for any occasion. Here are some serving suggestions to elevate your dessert experience:
- On a Stick: Serve the bars directly on their popsicle sticks for a fun and casual presentation. This is perfect for summer parties or family gatherings.
- With a Side of Sauce: Drizzle some chocolate or caramel sauce on the plate before placing the ice cream bar on top. This adds an extra layer of flavor and makes for a beautiful presentation.
- Accompanied by Fresh Fruit: Pair your ice cream bars with fresh fruit like strawberries, raspberries, or banana slices. The fruity flavors complement the richness of the chocolate and ice cream.
- Ice Cream Sundae Style: Cut the bars into smaller pieces and serve them in a bowl with whipped cream, nuts, and a cherry on top. This transforms your bars into a fun sundae treat!
- As Party Favors: Wrap individual bars in colorful wax paper or cellophane and tie them with a ribbon. These make delightful party favors for birthdays or special events.
- With a Scoop of Ice Cream: For an extra indulgent treat, serve your chocolate-covered bars alongside a scoop of the same or a different flavor of ice cream. This creates a delightful contrast in textures and flavors.
These serving suggestions not only enhance the visual appeal of your homemade chocolate-covered ice cream bars but also add to the overall experience. Whether you’re hosting a party or enjoying a quiet evening at home, these ideas will make your dessert even more enjoyable. So, gather your friends and family, and get ready to indulge in these delicious treats!
Tips for Perfect Homemade Chocolate-Covered Ice Cream Bars
Creating the perfect homemade chocolate-covered ice cream bars is all about attention to detail. With a few helpful tips, you can ensure that your treats turn out delicious and visually appealing every time. Here are some essential tips to keep in mind:
- Use Cold Ingredients: Make sure your ice cream is very cold before dipping. This helps the chocolate set quickly and prevents it from melting the ice cream.
- Chill Your Chocolate: If your melted chocolate is too warm, it can cause the ice cream to soften. Let it cool slightly before dipping to maintain the perfect texture.
- Double Dip for Extra Chocolate: For a thicker chocolate coating, dip the bars twice. Just let the first layer set before dipping again for a luscious finish.
- Keep Toppings Handy: Prepare your toppings in advance and have them ready to sprinkle right after dipping. This ensures they stick well to the chocolate.
- Use a Baking Sheet: Line a baking sheet with wax paper to place your dipped bars on. This prevents sticking and makes cleanup easier.
- Experiment with Flavors: Don’t hesitate to mix flavors! Try adding extracts like vanilla or almond to your chocolate for a unique twist.
- Let Them Set Properly: After dipping and topping, allow the bars to freeze for at least 30 minutes. This helps the chocolate harden and keeps everything intact.
- Serve with Style: Present your bars on a decorative platter or in a fun ice cream cone holder. A beautiful presentation makes the treat even more enjoyable!
By following these tips, you’ll create chocolate-covered ice cream bars that are not only delicious but also visually stunning. Enjoy the process and have fun experimenting with different flavors and toppings!
Breakdown of Time for Homemade Chocolate-Covered Ice Cream Bars
When making homemade chocolate-covered ice cream bars, it’s essential to plan your time wisely. Here’s a breakdown of the time you’ll need for each step of the process. This will help you manage your schedule and ensure everything goes smoothly!
Prep Time
The prep time for these delicious treats is quite manageable. You’ll spend about 15 to 20 minutes gathering your ingredients and preparing the ice cream bars. This includes scooping the ice cream into molds or a dish and inserting the popsicle sticks. If you’re using a dish, you’ll also need a few minutes to pack the ice cream down firmly. Once you’ve done that, it’s time to pop them in the freezer!
Cooking Time
While there’s no actual cooking involved, the melting of the chocolate will take about 10 minutes. If you’re using a microwave, remember to heat it in short intervals to avoid burning. If you’re using a double boiler, it may take a bit longer, around 10 to 15 minutes, depending on your stove. After melting, you’ll need to dip the bars, which will take another 10 minutes. So, the total time for this step is around 20 to 25 minutes.
Total Time
In total, you should expect to spend about 2 hours and 30 minutes to 3 hours from start to finish. This includes the time for the ice cream to freeze (at least 2 hours) and the time for the chocolate to set after dipping (about 30 minutes). While it may seem like a long time, most of it is hands-off, allowing you to relax while your treats come together!
With this time breakdown, you can easily plan your day and enjoy the process of making these delightful homemade chocolate-covered ice cream bars. Happy creating!
Nutritional Information for Homemade Chocolate-Covered Ice Cream Bars
When indulging in homemade chocolate-covered ice cream bars, it’s good to know what you’re enjoying. Here’s a breakdown of the nutritional information for these delightful treats. Keep in mind that the values can vary based on the ingredients you choose, especially the type of ice cream and chocolate.
Calories
On average, one homemade chocolate-covered ice cream bar contains about 200 to 300 calories. This number can change depending on the ice cream flavor and the amount of chocolate used. For instance, using a rich, creamy ice cream will increase the calorie count compared to a lighter option. If you’re watching your calorie intake, consider using lower-calorie ice cream or reducing the amount of chocolate coating.
Protein
Each chocolate-covered ice cream bar typically provides around 3 to 5 grams of protein. The protein content mainly comes from the ice cream, especially if you choose a brand that includes added protein. If you want to boost the protein content, consider using ice cream made with milk or yogurt, which can provide a healthier option while still being delicious.
Sodium
The sodium content in these treats can range from 50 to 150 milligrams per bar. This amount varies based on the toppings and the type of chocolate used. For example, if you add salted nuts or use chocolate with added salt, the sodium level will be higher. If you’re monitoring your sodium intake, be mindful of the toppings you choose and opt for unsalted varieties when possible.
Understanding the nutritional information can help you enjoy your homemade chocolate-covered ice cream bars while keeping your dietary goals in mind. Remember, moderation is key, and these treats can be a delightful part of a balanced diet!
FAQs About Homemade Chocolate-Covered Ice Cream Bars
Can I use any type of ice cream for these bars?
Absolutely! You can use any type of ice cream for your homemade chocolate-covered ice cream bars. Whether you prefer classic flavors like vanilla and chocolate or more adventurous options like mint chocolate chip or salted caramel, the choice is yours. Just make sure the ice cream is firm enough to hold its shape when dipped in chocolate. This way, you’ll get a perfect coating without any melting mess!
How do I store leftover chocolate-covered ice cream bars?
Storing leftover chocolate-covered ice cream bars is easy! Simply place them in an airtight container and keep them in the freezer. This will help prevent freezer burn and keep them fresh for longer. If you want to avoid sticking, you can layer the bars with wax paper in between. They should stay delicious for up to two weeks, but we doubt they’ll last that long!
Can I make these ice cream bars ahead of time?
Yes, you can definitely make these ice cream bars ahead of time! In fact, they are perfect for preparing in advance. Just follow the steps to make and dip the bars, then store them in the freezer until you’re ready to serve. This makes them a great option for parties or gatherings, allowing you to enjoy the fun without the last-minute rush!
What are some alternative toppings for chocolate-covered ice cream bars?
There are countless alternative toppings you can use to customize your chocolate-covered ice cream bars! Here are some fun ideas:
- Crushed Pretzels: For a sweet and salty crunch.
- Toasted Coconut: Adds a tropical flavor and chewy texture.
- Chopped Dried Fruits: Such as cranberries or apricots for a fruity twist.
- Granola: For a healthy crunch that adds fiber.
- Chocolate Chips: Mini chocolate chips can add extra chocolatey goodness.
Feel free to mix and match these toppings to create your own unique flavor combinations!
Conclusion on Homemade Chocolate-Covered Ice Cream Bars
In conclusion, homemade chocolate-covered ice cream bars are a delightful treat that brings joy to any occasion. They are not only easy to make but also allow for endless customization. Whether you choose classic flavors or get creative with unique combinations, these bars are sure to impress your family and friends.
By following the simple steps outlined in this article, you can create delicious ice cream bars that are perfect for summer gatherings, birthday parties, or just a sweet indulgence at home. The fun of dipping them in chocolate and adding your favorite toppings makes the process enjoyable for everyone, especially kids!
Remember, the key to perfecting your homemade chocolate-covered ice cream bars lies in using quality ingredients and being creative with flavors and toppings. Don’t hesitate to experiment and find what works best for you. With a little practice, you’ll master the art of making these delightful treats.
So, gather your ingredients, invite your loved ones to join in the fun, and start creating your own chocolate-covered ice cream bars today. Enjoy the creamy goodness and the smiles they bring, and don’t forget to share your delicious creations with others. Happy indulging!
Craving more delightful frozen treats? Don’t miss out on these must-try desserts:
- Cherry Chocolate Ice Cream Cake: A Delicious Indulgence
- Homemade Vanilla Custard Ice Cream: Pure Creamy Bliss
- Homemade Rich Chocolate Ice Cream: Decadent Perfection
For more fantastic recipes and food inspiration, follow us on Pinterest!