Introduction to Fruit Salad Cheesecake
Are you ready to treat yourself to something truly special? The Fruit Salad Cheesecake is a delightful dessert that combines the rich, creamy texture of cheesecake with the vibrant flavors of fresh fruits. This dessert is not just a feast for the taste buds; it’s also a feast for the eyes! With its colorful fruit topping, it brings a burst of freshness that makes every bite a joy. Whether you’re hosting a party or simply want to enjoy a sweet treat at home, this cheesecake is sure to impress.
What Makes Fruit Salad Cheesecake Special?
What sets the Fruit Salad Cheesecake apart from other desserts? First, it’s the perfect blend of creamy and fruity. The cheesecake filling is smooth and rich, while the fruit salad topping adds a refreshing crunch. This combination creates a delightful contrast that keeps you coming back for more. Additionally, it’s an easy-to-make dessert that doesn’t require baking, making it accessible for everyone, even novice bakers. Plus, you can customize the fruit topping based on what’s in season, ensuring that every cheesecake is unique and bursting with flavor!
Perfect Occasions for Serving Fruit Salad Cheesecake
Wondering when to serve this delicious dessert? The Fruit Salad Cheesecake is perfect for a variety of occasions. It’s an excellent choice for summer gatherings, picnics, and barbecues, where the fresh fruit can shine. Birthdays, anniversaries, or holiday celebrations are also great times to showcase this dessert. Its vibrant colors and delightful taste make it a crowd-pleaser, ensuring that your guests will leave with smiles on their faces. Whether it’s a casual family dinner or a fancy event, this cheesecake fits right in!
Ingredients for Fruit Salad Cheesecake
To create a delicious Fruit Salad Cheesecake, you’ll need a few simple ingredients. Each component plays a vital role in achieving that creamy texture and fruity flavor. Here’s what you’ll need:
For the Crust:
- 1 ½ cups graham cracker crumbs
- ½ cup unsalted butter, melted
- ¼ cup granulated sugar
For the Cheesecake Filling:
- 16 ounces cream cheese, softened
- 1 cup powdered sugar
- 1 teaspoon vanilla extract
- 1 cup heavy whipping cream
For the Fruit Salad Topping:
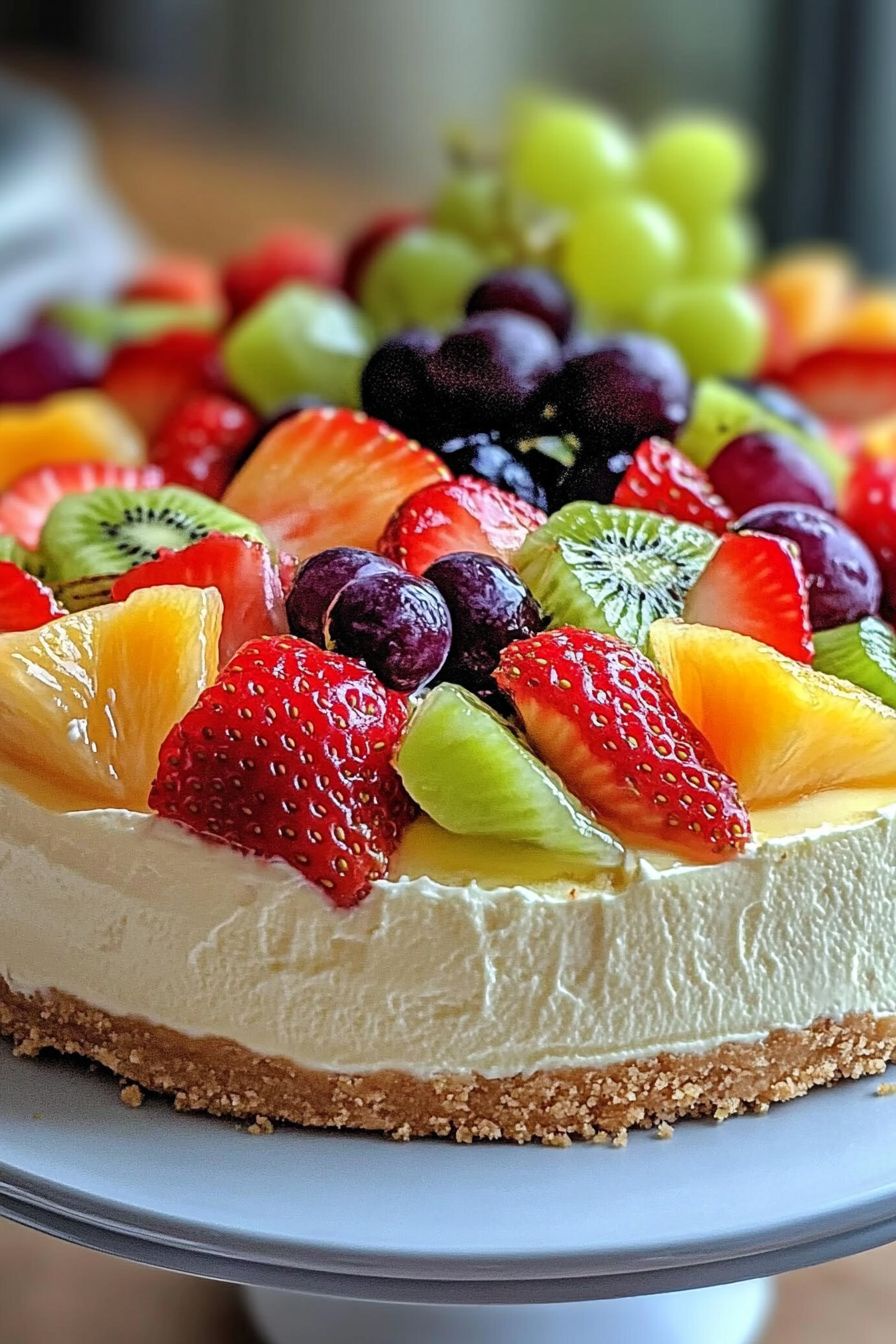
- 2 cups mixed fresh fruits (such as strawberries, blueberries, kiwi, and pineapple)
- 1 tablespoon honey or maple syrup (optional, for sweetness)
- 1 tablespoon lemon juice (to enhance flavor and prevent browning)
These ingredients come together to create a delightful dessert that’s both creamy and refreshing. Feel free to mix and match your favorite fruits for the topping. The more colorful, the better! Now that you have your ingredients ready, let’s move on to the preparation steps.
Step-by-Step Preparation of Fruit Salad Cheesecake
Now that you have all your ingredients ready, it’s time to dive into the fun part: making your Fruit Salad Cheesecake! Follow these simple steps to create a dessert that will wow your family and friends.
Step 1: Prepare the Crust
First, let’s get started with the crust. In a mixing bowl, combine the graham cracker crumbs, melted butter, and granulated sugar. Mix everything together until the crumbs are well-coated and resemble wet sand. Next, press this mixture firmly into the bottom of a 9-inch springform pan. Make sure it’s even and compact. This will create a sturdy base for your cheesecake. Once done, set it aside while you prepare the filling.
Step 2: Make the Cheesecake Filling
Now, it’s time to make the creamy filling! In a large mixing bowl, beat the softened cream cheese until it’s smooth and fluffy. Gradually add the powdered sugar and vanilla extract, mixing until well combined. In another bowl, whip the heavy cream until stiff peaks form. Gently fold the whipped cream into the cream cheese mixture. This step is crucial as it adds lightness to your cheesecake. Be careful not to deflate the whipped cream. Once combined, your filling is ready!
Step 3: Chill the Cheesecake
With the filling ready, pour it over the prepared crust in the springform pan. Smooth the top with a spatula for an even finish. Now, cover the pan with plastic wrap and place it in the refrigerator. Chill for at least 4 hours, or overnight if you can wait! This chilling time allows the cheesecake to set properly, making it easier to slice later.
Step 4: Prepare the Fruit Salad Topping
While your cheesecake is chilling, let’s prepare the fruit salad topping. In a mixing bowl, combine your choice of mixed fresh fruits. You can use strawberries, blueberries, kiwi, and pineapple for a colorful mix. If you like, drizzle honey or maple syrup over the fruits for added sweetness. Then, add the lemon juice to enhance the flavors and prevent the fruits from browning. Toss everything gently to combine, and set it aside until the cheesecake is ready.
Step 5: Assemble the Fruit Salad Cheesecake
Once your cheesecake has set, it’s time to assemble! Carefully remove the cheesecake from the springform pan. Place it on a serving platter. Top the cheesecake with the prepared fruit salad, spreading it evenly across the surface. The vibrant colors of the fruits will make your cheesecake look stunning! For an extra touch, you can garnish with mint leaves or a dusting of powdered sugar. Your Fruit Salad Cheesecake is now ready to be served!
Variations of Fruit Salad Cheesecake
While the classic Fruit Salad Cheesecake is delicious on its own, there are many fun variations you can try! By changing up the fruit combinations or experimenting with different crust options, you can create a unique dessert every time. Let’s explore some exciting ideas!
Different Fruit Combinations
The beauty of the Fruit Salad Cheesecake lies in its versatility. You can use any seasonal fruits you love! Here are some delightful combinations to consider:
- Tropical Twist: Use mango, papaya, and coconut for a refreshing tropical vibe.
- Berry Medley: Combine strawberries, raspberries, and blackberries for a berry-packed delight.
- Citrus Burst: Mix oranges, grapefruits, and tangerines for a zesty flavor.
- Autumn Harvest: Try apples, pears, and pomegranate seeds for a fall-inspired treat.
Feel free to mix and match these fruits based on your preferences. The key is to choose fruits that complement each other in flavor and color. This way, your cheesecake will not only taste amazing but also look stunning!
Alternative Crust Options
If you want to switch things up, consider trying different crust options for your Fruit Salad Cheesecake. Here are a few ideas:
- Chocolate Cookie Crust: Use crushed chocolate cookies instead of graham crackers for a rich, chocolatey base.
- Almond Crust: Blend almond flour with melted butter and a bit of sugar for a nutty flavor.
- Oreo Crust: Crush Oreo cookies for a sweet and creamy crust that pairs perfectly with the cheesecake.
- Gluten-Free Crust: Use gluten-free graham crackers or nut-based crusts for a gluten-free option.
These alternative crusts can add a new dimension to your cheesecake, making it even more enjoyable. Experiment with different flavors and textures to find your favorite combination!
Cooking Note for Fruit Salad Cheesecake
When making the Fruit Salad Cheesecake, there are a few important cooking notes to keep in mind. These tips will help ensure that your cheesecake turns out perfectly every time!
First, always use room temperature cream cheese. This makes it easier to blend and results in a smoother filling. If your cream cheese is too cold, it can create lumps in the mixture, which you want to avoid.
Next, be gentle when folding the whipped cream into the cream cheese mixture. This step is crucial for achieving that light and airy texture. Use a spatula and fold in a circular motion to maintain the volume of the whipped cream.
Chilling the cheesecake is another key step. Make sure to allow enough time for it to set properly in the refrigerator. If you rush this step, the cheesecake may not hold its shape when sliced. Ideally, let it chill overnight for the best results.
Lastly, when preparing the fruit salad topping, wash and dry the fruits thoroughly. Excess moisture can make the topping soggy. If you’re using fruits that tend to brown, like apples or bananas, consider adding a bit more lemon juice to keep them fresh and vibrant.
By following these cooking notes, you’ll create a stunning and delicious Fruit Salad Cheesecake that will impress everyone at your gathering. Happy baking!
Serving Suggestions for Fruit Salad Cheesecake
Now that your Fruit Salad Cheesecake is ready, it’s time to think about how to serve it! The right presentation and beverage pairings can elevate your dessert experience. Here are some delightful suggestions to make your cheesecake shine at any gathering.
Pairing with Beverages
Choosing the right beverages to accompany your cheesecake can enhance its flavors. Here are some great options:
- Fresh Lemonade: The zesty flavor of lemonade complements the fruity topping beautifully. It’s refreshing and perfect for summer!
- Iced Tea: A glass of sweetened or unsweetened iced tea pairs well with the creamy cheesecake. You can even add a slice of lemon for an extra zing.
- Fruit-Infused Water: Keep it light and refreshing with water infused with slices of citrus fruits or berries. This adds a subtle flavor that won’t overpower the cheesecake.
- White Wine: If you prefer an adult beverage, a chilled glass of white wine, like Riesling or Sauvignon Blanc, can enhance the dessert’s fruity notes.
These beverage options will not only complement your Fruit Salad Cheesecake but also keep your guests refreshed and happy!
Presentation Ideas
Presentation is key when serving your cheesecake. Here are some creative ideas to make your dessert look as good as it tastes:
- Garnish with Mint: Add a few fresh mint leaves on top of the fruit salad for a pop of color and a hint of freshness.
- Use a Cake Stand: Elevate your cheesecake on a decorative cake stand. This adds height and makes it the centerpiece of your dessert table.
- Drizzle with Sauce: Consider drizzling a fruit sauce or chocolate sauce over the cheesecake before serving. This adds an extra layer of flavor and visual appeal.
- Individual Servings: For a fun twist, serve mini cheesecakes in small cups or jars. This makes for easy serving and a cute presentation!
With these serving suggestions, your Fruit Salad Cheesecake will not only taste amazing but also look stunning on the table. Enjoy sharing this delightful dessert with your friends and family!
Tips for Making the Perfect Fruit Salad Cheesecake
Creating a delicious Fruit Salad Cheesecake is all about the details. With a few helpful tips, you can ensure that your cheesecake turns out perfectly every time. Here are some essential tips to keep in mind:
First, always measure your ingredients accurately. Baking is a science, and precise measurements can make a big difference in the final product. Use measuring cups and spoons for dry ingredients and a liquid measuring cup for wet ingredients. This will help you achieve the right texture and flavor.
Next, don’t skip the chilling time! Allowing your cheesecake to chill for at least four hours, or ideally overnight, is crucial. This helps the filling set properly, making it easier to slice and serve. Patience is key here, so resist the urge to dig in too soon!
When preparing the fruit salad topping, choose ripe, fresh fruits for the best flavor. Look for fruits that are in season, as they will be sweeter and more vibrant. Wash and dry the fruits thoroughly to prevent excess moisture, which can make the topping soggy.
For added flavor, consider mixing in a splash of vanilla extract or a sprinkle of cinnamon into the fruit salad. This can enhance the overall taste and make your cheesecake even more delightful.
Lastly, if you want to make your cheesecake extra special, consider adding a layer of fruit sauce or a fruit glaze on top of the fruit salad. This not only adds flavor but also gives your cheesecake a beautiful, glossy finish.
By following these tips, you’ll be well on your way to creating a stunning and delicious Fruit Salad Cheesecake that will impress everyone at your gathering. Happy baking!
Breakdown of Time for Fruit Salad Cheesecake
When planning to make your Fruit Salad Cheesecake, it’s essential to know how much time you’ll need. This will help you organize your day and ensure everything is ready when you want to serve it. Here’s a simple breakdown of the time required for each step of the process.
Prep Time
The prep time for your Fruit Salad Cheesecake is approximately 30 minutes. This includes gathering your ingredients, preparing the crust, making the cheesecake filling, and preparing the fruit salad topping. It’s a straightforward process, and with everything ready, you’ll be on your way to a delicious dessert in no time!
Cooking Time
Since this cheesecake is a no-bake recipe, there’s no actual cooking time involved. However, you will need to chill the cheesecake for at least 4 hours. This chilling time is crucial for the cheesecake to set properly, so plan accordingly. If you can, chilling it overnight will yield the best results!
Total Time
In total, you should expect to spend about 30 minutes on preparation and at least 4 hours for chilling. This brings your total time to approximately 4 hours and 30 minutes. If you choose to chill it overnight, you can prepare it the day before your event, making it a convenient option for busy schedules.
With this time breakdown, you can easily plan your baking day and ensure your Fruit Salad Cheesecake is ready to impress your guests!
Nutritional Information for Fruit Salad Cheesecake
Understanding the nutritional content of your Fruit Salad Cheesecake can help you enjoy it even more. This dessert is not only delicious but can also fit into a balanced diet when enjoyed in moderation. Here’s a breakdown of the key nutritional components:
Calories
One slice of Fruit Salad Cheesecake typically contains around 300-350 calories. This can vary based on the specific ingredients and portion sizes used. The creamy filling and fresh fruit topping contribute to the calorie count, making it a satisfying treat. Enjoying a slice as an occasional dessert can be a delightful way to indulge without overdoing it!
Protein
Each slice of cheesecake provides approximately 5-7 grams of protein. The cream cheese and heavy whipping cream are the primary sources of protein in this dessert. Protein is essential for building and repairing tissues, making this cheesecake a tasty way to add some protein to your day while enjoying a sweet treat.
Sodium
The sodium content in a slice of Fruit Salad Cheesecake is generally around 200-250 milligrams. Most of the sodium comes from the cream cheese and any added ingredients. If you’re watching your sodium intake, consider using low-sodium cream cheese or adjusting the amount of salt in the crust. This way, you can enjoy your cheesecake while keeping your dietary needs in mind.
By being aware of the nutritional information, you can savor your Fruit Salad Cheesecake with confidence. Remember, moderation is key, and this dessert can be a delightful part of a balanced diet!
FAQs about Fruit Salad Cheesecake
Can I make Fruit Salad Cheesecake ahead of time?
Absolutely! The Fruit Salad Cheesecake is perfect for making ahead of time. In fact, it’s best to prepare it a day in advance. This allows the cheesecake to chill and set properly, enhancing its flavor and texture. Just cover it well with plastic wrap or foil and store it in the refrigerator. When you’re ready to serve, simply add the fruit topping, and it’s good to go!
What fruits work best for the topping?
When it comes to the fruit topping, the options are endless! You can use any fresh fruits you enjoy. Some popular choices include strawberries, blueberries, kiwi, and pineapple. These fruits not only taste great but also add vibrant colors to your cheesecake. Feel free to mix and match based on what’s in season or your personal preferences. The key is to choose ripe, fresh fruits for the best flavor!
Is it possible to make a gluten-free version of Fruit Salad Cheesecake?
Yes, you can easily make a gluten-free Fruit Salad Cheesecake! Simply substitute the graham cracker crumbs with gluten-free alternatives, such as gluten-free cookie crumbs or almond flour. Make sure to check the labels of all your ingredients to ensure they are gluten-free. This way, everyone can enjoy this delicious dessert without worry!
How long can I store leftover Fruit Salad Cheesecake?
If you have any leftovers, you can store them in the refrigerator for up to 3-4 days. Make sure to cover the cheesecake tightly with plastic wrap or foil to keep it fresh. The fruit topping may start to lose its texture after a day, so it’s best to add fresh fruit just before serving. Enjoy your cheesecake while it’s still creamy and delicious!
Conclusion on Fruit Salad Cheesecake
In conclusion, the Fruit Salad Cheesecake is a delightful dessert that brings together the best of both worlds: the creamy richness of cheesecake and the refreshing burst of seasonal fruits. This easy-to-make, no-bake treat is perfect for any occasion, whether it’s a summer barbecue, a birthday celebration, or simply a sweet ending to a family dinner. With its vibrant colors and delicious flavors, it’s sure to impress your guests and leave them wanting more.
Final Thoughts on Enjoying This Delightful Dessert
As you prepare to make your own Fruit Salad Cheesecake, remember that the joy of this dessert lies not just in its taste but also in the experience of sharing it with loved ones. Feel free to experiment with different fruit combinations and crust options to make it your own. The possibilities are endless! So gather your ingredients, follow the steps, and enjoy the process of creating something truly special.
Whether you’re indulging in a slice yourself or serving it to friends and family, this cheesecake is bound to bring smiles and satisfaction. So go ahead, treat yourself to this fruity delight, and savor every delicious bite!