Introduction to Coconut Ice Cream
What Makes Coconut Ice Cream Special?
Coconut Ice Cream is not just any dessert; it’s a tropical escape in a bowl! The creamy texture of coconut milk combined with the delightful chew of shredded coconut creates a unique experience. Each spoonful is like a mini-vacation, bringing the essence of the tropics right to your home. The subtle sweetness and rich flavor make it a favorite among ice cream lovers. Plus, it’s dairy-free, making it a great option for those with lactose intolerance or anyone following a vegan lifestyle. With its refreshing taste, Coconut Ice Cream is perfect for hot summer days or any time you crave something cool and delicious.
The Benefits of Homemade Coconut Ice Cream
Making Coconut Ice Cream at home has many advantages. First, you control the ingredients, ensuring everything is fresh and natural. This means no artificial flavors or preservatives! Homemade ice cream is also customizable. You can adjust the sweetness or add your favorite mix-ins, like fruits or nuts. Additionally, it’s a fun activity to do with family or friends. Everyone can join in the process, from mixing to tasting. Lastly, homemade Coconut Ice Cream is often healthier than store-bought options, as you can use organic coconut milk and sweeteners of your choice. So, why not whip up a batch and enjoy the benefits of this delightful treat?
Ingredients for Coconut Ice Cream
To create your own delicious Coconut Ice Cream, you’ll need a few simple ingredients. Each one plays a vital role in achieving that creamy, tropical flavor. Here’s what you’ll need:
- 2 cans of full-fat coconut milk: This is the base of your ice cream, providing a rich and creamy texture.
- 1 cup of shredded coconut: Adds a delightful chewiness and enhances the coconut flavor.
- ½ cup of sweetener: You can use sugar, maple syrup, or agave nectar, depending on your preference.
- 1 teaspoon of vanilla extract: This adds a lovely aroma and depth of flavor to your ice cream.
- Pinch of salt: A little salt helps to balance the sweetness and enhance the overall taste.
These ingredients are not only easy to find but also work together to create a refreshing dessert. Feel free to experiment with different sweeteners or add-ins to make it your own. Now that you have your ingredients ready, let’s move on to the next step of making this delightful Coconut Ice Cream!
Step-by-Step Preparation of Coconut Ice Cream
Step 1: Gather Your Ingredients
Before you start making your Coconut Ice Cream, it’s important to gather all your ingredients. This makes the process smoother and more enjoyable. Make sure you have:
- 2 cans of full-fat coconut milk
- 1 cup of shredded coconut
- ½ cup of your chosen sweetener
- 1 teaspoon of vanilla extract
- A pinch of salt
Having everything ready will help you focus on creating a delicious treat without any interruptions. Once you have your ingredients, you’re ready to move on to the next step!
Step 2: Mix the Base
Now it’s time to create the creamy base for your Coconut Ice Cream. In a large mixing bowl, combine the full-fat coconut milk, sweetener, vanilla extract, and a pinch of salt. Use a whisk or a hand mixer to blend everything together until it’s smooth and well combined. This step is crucial as it ensures that the sweetener dissolves completely, giving your ice cream a consistent flavor. Once mixed, you’ll have a luscious coconut base that’s ready for the next step!
Step 3: Incorporate Shredded Coconut
Next, it’s time to add the shredded coconut to your mixture. Gently fold in the shredded coconut using a spatula. This will add texture and enhance the coconut flavor in your ice cream. Make sure to distribute the shredded coconut evenly throughout the mixture. This way, every scoop will be packed with that delightful coconut goodness. Once you’ve mixed it in, your base is almost ready!
Step 4: Churn the Mixture
If you have an ice cream maker, pour the mixture into it and churn according to the manufacturer’s instructions. Churning incorporates air into the ice cream, making it light and fluffy. If you don’t have an ice cream maker, don’t worry! You can still make this treat. Simply pour the mixture into a shallow dish and place it in the freezer. Stir it every 30 minutes for about 2-3 hours. This will help create a creamy texture without an ice cream maker.
Step 5: Freeze the Coconut Ice Cream
Once your mixture is churned or stirred, it’s time to freeze it. Transfer the ice cream to an airtight container. Smooth the top with a spatula and cover it tightly. Place it in the freezer for at least 4 hours, or until it’s firm. This final freezing step is essential for achieving that perfect scoopable texture. After waiting patiently, your Coconut Ice Cream will be ready to enjoy!
Variations of Coconut Ice Cream
Adding Fruits to Coconut Ice Cream
One of the best things about Coconut Ice Cream is how versatile it is! You can easily add fruits to create exciting new flavors. For instance, consider mixing in fresh mango, pineapple, or strawberries. These fruits not only add vibrant colors but also enhance the tropical vibe of your ice cream. To incorporate fruits, simply chop them into small pieces and fold them into the coconut mixture before churning. You can also blend fruits into a puree and swirl it into the ice cream for a beautiful marbled effect. This fruity twist will make your Coconut Ice Cream even more refreshing and delicious!
Chocolate Coconut Ice Cream Twist
If you’re a chocolate lover, you can give your Coconut Ice Cream a delightful chocolate twist! To do this, add cocoa powder or melted dark chocolate to the base mixture. Start with about ¼ cup of cocoa powder or ½ cup of melted chocolate, adjusting to your taste. Mix it well with the coconut milk, sweetener, and vanilla extract. This will create a rich, chocolatey flavor that pairs perfectly with the coconut. You can even add chocolate chips or chunks of dark chocolate for extra texture. This variation is sure to satisfy your sweet tooth while keeping that creamy coconut goodness!
Cooking Note for Coconut Ice Cream
When making Coconut Ice Cream, there are a few important cooking notes to keep in mind. First, always use full-fat coconut milk for the best results. This type of coconut milk provides the rich and creamy texture that makes your ice cream so delightful. Low-fat or light coconut milk may not yield the same creamy consistency.
Additionally, if you prefer a sweeter ice cream, feel free to adjust the amount of sweetener to your liking. Taste the mixture before freezing it to ensure it meets your sweetness preference. Remember, the sweetness may slightly diminish once frozen, so it’s okay to make it a bit sweeter than you think.
Another tip is to chill your mixing bowl and whisk before starting. This helps keep the mixture cold, which can improve the texture of your ice cream. If you’re using an ice cream maker, make sure the bowl is completely frozen according to the manufacturer’s instructions. This will help your ice cream churn properly and achieve that perfect creamy texture.
Lastly, if you want to add any mix-ins, like nuts or chocolate chips, do so after the churning process. Gently fold them in just before transferring the ice cream to the freezer. This way, they’ll be evenly distributed without getting too hard or icy. With these cooking notes in mind, you’re all set to create a delicious batch of Coconut Ice Cream!
Serving Suggestions for Coconut Ice Cream
Pairing Coconut Ice Cream with Toppings
When it comes to serving Coconut Ice Cream, the right toppings can elevate your dessert to a whole new level! Here are some delightful options to consider:
- Fresh Fruits: Slices of mango, strawberries, or kiwi add a burst of color and flavor. They complement the creamy coconut perfectly.
- Chocolate Sauce: Drizzling warm chocolate sauce over your ice cream creates a delicious contrast. The rich chocolate pairs beautifully with the coconut.
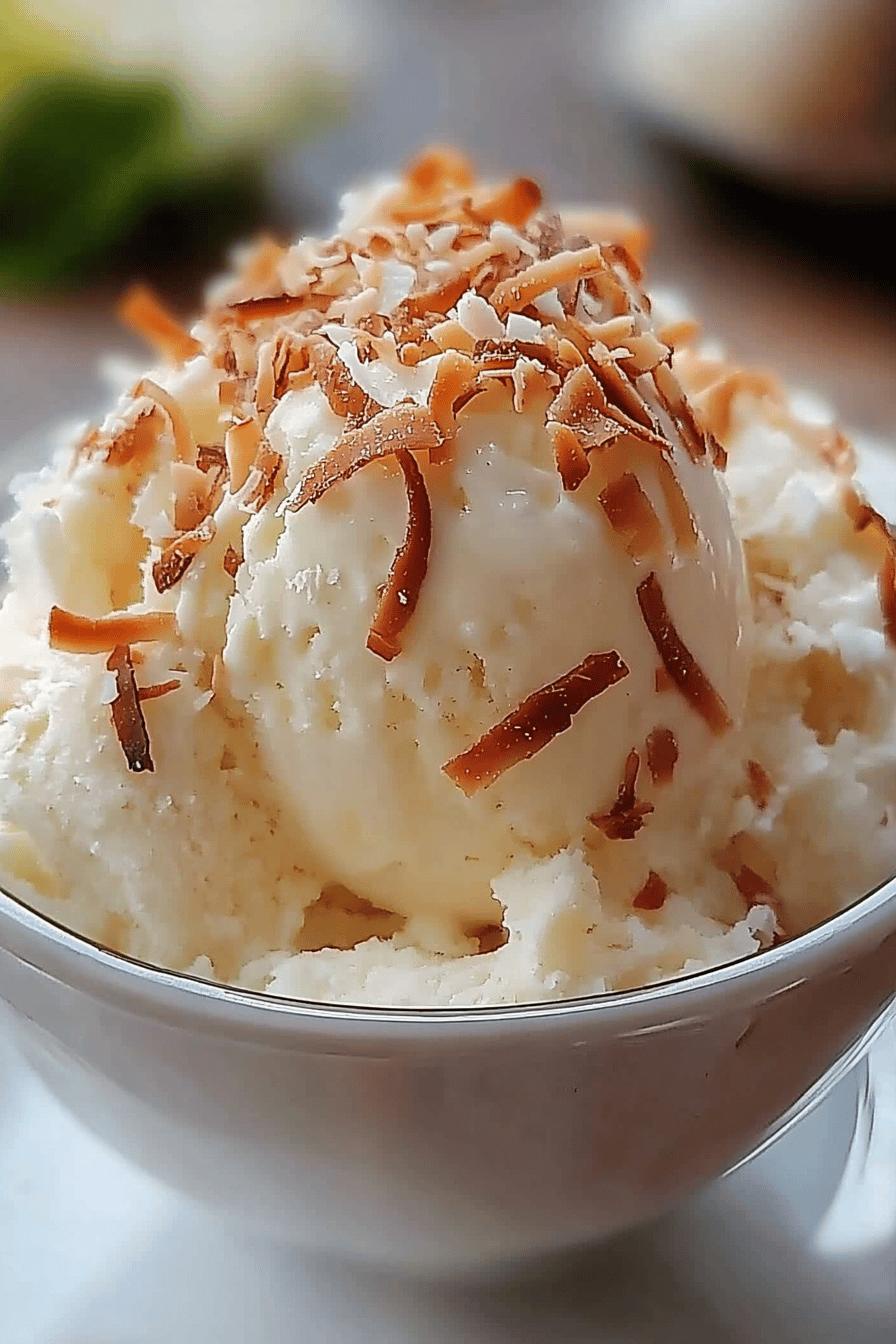
- Toasted Coconut Flakes: For an extra coconut kick, sprinkle some toasted coconut flakes on top. This adds a crunchy texture that enhances the overall experience.
- Nuts: Chopped almonds or walnuts provide a satisfying crunch. They also add healthy fats and protein to your dessert.
- Whipped Cream: A dollop of coconut whipped cream can make your ice cream feel even more indulgent. It’s a light and fluffy addition that’s hard to resist!
Feel free to mix and match these toppings to create your perfect bowl of Coconut Ice Cream. The combinations are endless, and each one brings its own unique twist to this tropical treat!
Creative Ways to Serve Coconut Ice Cream
Serving Coconut Ice Cream can be as fun as making it! Here are some creative ideas to impress your family and friends:
- Ice Cream Sandwiches: Use two cookies or brownies to create a delicious ice cream sandwich. The chewy texture of the cookies pairs wonderfully with the creamy ice cream.
- Ice Cream Sundaes: Create a tropical sundae by layering Coconut Ice Cream with your favorite toppings in a tall glass. Add a cherry on top for a classic touch!
- Fruit Bowls: Serve your Coconut Ice Cream in hollowed-out fruit, like pineapples or coconuts. This not only looks stunning but also adds an extra fruity flavor.
- Milkshakes: Blend Coconut Ice Cream with a splash of coconut milk for a refreshing milkshake. This is a great way to enjoy your ice cream in a new form!
- Frozen Pops: Pour the mixture into popsicle molds before freezing. This creates fun, portable treats that are perfect for hot days.
These serving suggestions will not only make your Coconut Ice Cream more enjoyable but also add a touch of creativity to your dessert experience. So, get ready to impress your guests with these fun ideas!
Tips for Perfect Coconut Ice Cream
Choosing the Right Coconut Milk
When it comes to making Coconut Ice Cream, the type of coconut milk you choose is crucial. Always opt for full-fat coconut milk for the best results. This rich and creamy base is what gives your ice cream its delightful texture. Look for brands that use minimal ingredients, ideally just coconut and water. Avoid those with added preservatives or artificial flavors, as they can affect the taste of your ice cream.
If you want a lighter version, you can mix full-fat coconut milk with a bit of light coconut milk. This way, you still get that creamy texture while reducing the fat content. However, keep in mind that using only light coconut milk may result in a less creamy ice cream. Always shake the can well before using, as the cream can separate from the liquid. This ensures a smooth and consistent mixture for your ice cream.
Storing Coconut Ice Cream Properly
To keep your Coconut Ice Cream fresh and delicious, proper storage is key. Once your ice cream is fully frozen, transfer it to an airtight container. This helps prevent ice crystals from forming, which can make your ice cream grainy. Make sure to smooth the top with a spatula before sealing the container. This minimizes air exposure, keeping your ice cream creamy and flavorful.
Store your Coconut Ice Cream in the coldest part of your freezer, ideally at 0°F (-18°C) or lower. This helps maintain its texture and prevents it from becoming too hard. When you’re ready to enjoy it, let it sit at room temperature for a few minutes before scooping. This will make it easier to serve. Homemade Coconut Ice Cream can last in the freezer for about 2-3 weeks, but it’s best enjoyed fresh for optimal flavor and texture. With these tips, you’ll be able to savor your Coconut Ice Cream at its best!
Breakdown of Time for Coconut Ice Cream
Prep Time
Preparing your Coconut Ice Cream is a breeze! The prep time is quite short, taking only about 15 minutes. This includes gathering your ingredients, mixing the base, and incorporating the shredded coconut. It’s a quick and enjoyable process that sets the stage for your delicious treat. So, grab your ingredients and get ready to whip up something special!
Cooking Time
When it comes to cooking time, the actual churning or stirring of the mixture takes about 20-30 minutes. If you’re using an ice cream maker, this is the time it takes to churn the mixture until it’s light and fluffy. If you’re doing it by hand, remember to stir every 30 minutes for about 2-3 hours while it freezes. This helps achieve that creamy texture we all love. So, whether you’re churning or stirring, you’ll be just a little while away from enjoying your Coconut Ice Cream!
Total Time
In total, you should expect to spend around 4-5 hours to make your Coconut Ice Cream. This includes the prep time, cooking time, and the final freezing period. The majority of this time is simply waiting for the ice cream to freeze and firm up. But don’t worry! The wait is worth it, and you’ll be rewarded with a delightful, creamy dessert that’s perfect for any occasion. So, sit back, relax, and let your Coconut Ice Cream come to life!
Nutritional Information for Coconut Ice Cream
Calories in Coconut Ice Cream
When indulging in Coconut Ice Cream, it’s good to know the calorie content. A typical serving of this delightful treat, which is about half a cup, contains approximately 200-250 calories. This can vary based on the specific ingredients and sweeteners you choose. While it’s a rich dessert, the natural ingredients make it a satisfying option for a sweet treat. Enjoying it in moderation allows you to savor the tropical flavors without overindulging.
Protein Content
In terms of protein, Coconut Ice Cream is not a significant source. A half-cup serving typically contains around 2-3 grams of protein. This is mainly due to the coconut milk used in the recipe. While it may not provide a high protein boost, it does offer healthy fats and a delicious flavor that can be enjoyed as part of a balanced diet. Pairing it with nuts or seeds can enhance the protein content if desired.
Sodium Levels
When it comes to sodium, Coconut Ice Cream is relatively low. A serving usually contains about 5-10 milligrams of sodium. This is quite minimal, especially compared to many other desserts. The pinch of salt added during preparation helps enhance the flavors without significantly increasing sodium levels. This makes Coconut Ice Cream a heart-friendly dessert option that you can enjoy guilt-free!
FAQs about Coconut Ice Cream
Can I make Coconut Ice Cream without an ice cream maker?
Absolutely! You can make Coconut Ice Cream without an ice cream maker. Simply pour your mixture into a shallow dish and place it in the freezer. Stir it every 30 minutes for about 2-3 hours. This method helps incorporate air into the mixture, giving it a creamy texture. It’s a simple and effective way to enjoy homemade ice cream without any special equipment!
How long does Coconut Ice Cream last in the freezer?
Your homemade Coconut Ice Cream can last in the freezer for about 2-3 weeks. To keep it fresh, store it in an airtight container. Make sure to smooth the top before sealing to minimize air exposure. While it’s best enjoyed fresh, it can still be delicious after a few weeks. Just remember to let it sit at room temperature for a few minutes before scooping for the best texture!
Is Coconut Ice Cream suitable for a vegan diet?
Yes, Coconut Ice Cream is a fantastic option for those following a vegan diet! Since it’s made with coconut milk and plant-based sweeteners, it contains no animal products. This makes it a delicious and creamy treat that everyone can enjoy, regardless of dietary preferences. So, feel free to indulge in this tropical delight!
Can I use fresh coconut instead of shredded coconut?
Yes, you can use fresh coconut instead of shredded coconut! Fresh coconut will add a delightful texture and flavor to your ice cream. Just make sure to finely chop or grate the fresh coconut before adding it to the mixture. This will help distribute the coconut evenly throughout the ice cream. Enjoy the fresh taste of coconut in every scoop!
Conclusion on Coconut Ice Cream
Why You Should Try Making Coconut Ice Cream at Home
Making Coconut Ice Cream at home is not just about enjoying a delicious dessert; it’s an experience filled with joy and creativity. The process allows you to connect with the ingredients, ensuring that every scoop is made with love and care. Plus, you have the freedom to customize your ice cream to suit your taste. Whether you prefer it sweet, fruity, or with a chocolate twist, the possibilities are endless!
Moreover, homemade Coconut Ice Cream is a healthier alternative to store-bought options. You can choose organic ingredients and avoid artificial additives, making it a guilt-free treat. It’s also a fantastic way to impress family and friends during gatherings or summer parties. Imagine serving a bowl of creamy Coconut Ice Cream topped with fresh fruits or drizzled with chocolate sauce. It’s sure to be a hit!
So, why wait? Gather your ingredients and start your Coconut Ice Cream adventure today! With just a few simple steps, you can create a tropical delight that will transport you to a beach paradise with every bite. Enjoy the process, share it with loved ones, and savor the delightful flavors of your homemade Coconut Ice Cream. You won’t regret it!
Relevant Recipes Link:
Craving more delightful frozen treats? Dive into these scrumptious recipes:
- Coconut Lime Sorbet: A Refreshing Summer Treat
- Mexican Fried Ice Cream: A Must-Try Dessert
- Cherry Chocolate Ice Cream Cake: A Must-Try Dessert
For more fantastic recipes and food inspiration, follow us on Pinterest!