Introduction to the Classic Vanilla Cake Recipe
Welcome to the world of baking, where the aroma of freshly baked goods fills the air! Today, we’re diving into a delightful treat that has stood the test of time: the classic vanilla cake. This cake is not just a dessert; it’s a celebration of flavors and memories. Whether it’s a birthday, an anniversary, or just a cozy family gathering, this cake fits right in.
The Allure of Vanilla in Baking
Vanilla is often called the queen of flavors, and for good reason! Its sweet, warm notes can elevate any dish. When used in baking, vanilla adds a rich depth that enhances the overall taste. The subtle yet distinct flavor of vanilla makes it a favorite among many. It pairs beautifully with other ingredients, making it versatile for various recipes.
In this classic vanilla cake recipe, the vanilla shines through, creating a soft and tender crumb that melts in your mouth. The cake is simple yet elegant, making it perfect for any occasion. Plus, it’s easy to make, even for beginner bakers! So, roll up your sleeves and get ready to create a masterpiece that will impress your family and friends.
Let’s explore the ingredients and steps needed to whip up this delicious classic vanilla cake. You’ll be amazed at how quickly you can bring this delightful dessert to life!
Ingredients for the Classic Vanilla Cake Recipe
To create the perfect classic vanilla cake, you’ll need a few simple ingredients. Each one plays a vital role in achieving that soft, tender crumb and delightful flavor. Here’s what you’ll need:
- 2 cups all-purpose flour: This is the base of your cake, providing structure and texture.
- 1 ½ cups granulated sugar: Sugar adds sweetness and helps create a moist cake.
- ½ cup unsalted butter: Softened butter gives richness and flavor to the cake.
- 1 cup milk: Milk adds moisture and helps bind the ingredients together.
- 3 large eggs: Eggs provide structure and stability, making the cake rise beautifully.
- 2 ½ teaspoons baking powder: This leavening agent helps the cake rise and become fluffy.
- 1 teaspoon vanilla extract: The star of the show! Vanilla extract enhances the flavor.
- ½ teaspoon salt: Salt balances the sweetness and enhances the overall flavor.
These ingredients are easy to find and often already in your pantry. The combination of flour, sugar, and butter creates a classic cake base, while the eggs and milk add moisture. The baking powder ensures your cake rises perfectly, and the vanilla extract brings that irresistible flavor we all love.
Now that you have your ingredients ready, let’s move on to the next step: preparing your baking tools and ingredients!
Step-by-Step Preparation of the Classic Vanilla Cake Recipe
Now that you have gathered all your ingredients, it’s time to dive into the fun part: baking! Follow these simple steps to create your classic vanilla cake. Each step is designed to guide you through the process, ensuring your cake turns out perfectly every time.
Step 1: Prepping Your Baking Tools and Ingredients
Before you start mixing, it’s essential to prepare your baking tools. Gather the following:
- Two 9-inch round cake pans
- Mixing bowls
- Measuring cups and spoons
- Electric mixer or whisk
- Spatula
- Cooling rack
Next, preheat your oven to 350°F (175°C). This ensures your cake bakes evenly. Grease the cake pans with butter or cooking spray, and lightly dust them with flour. This will help the cake release easily after baking.
Step 2: Mixing the Dry Ingredients
In a medium bowl, combine the all-purpose flour, baking powder, and salt. Whisk them together until they are well mixed. This step is crucial as it ensures the baking powder is evenly distributed throughout the flour. Set this bowl aside for now.
Step 3: Creaming the Butter and Sugar
In a large mixing bowl, add the softened unsalted butter and granulated sugar. Using an electric mixer, beat them together on medium speed until the mixture is light and fluffy. This usually takes about 3-5 minutes. The air incorporated during this step will help your cake rise beautifully!
Step 4: Incorporating Eggs and Vanilla
Next, add the eggs one at a time, mixing well after each addition. This helps to create a smooth batter. Then, pour in the vanilla extract and mix until everything is well combined. The sweet aroma of vanilla will fill your kitchen, making it hard to resist a taste!
Step 5: Combining Wet and Dry Ingredients
Now, it’s time to combine the dry ingredients with the wet mixture. Start by adding about one-third of the flour mixture to the butter mixture. Then, pour in half of the milk. Mix on low speed until just combined. Repeat this process, alternating between the flour and milk, until everything is mixed together. Be careful not to overmix; a few lumps are okay!
Step 6: Pouring the Batter into the Pan
Once your batter is ready, divide it evenly between the two prepared cake pans. Use a spatula to smooth the tops, ensuring an even surface. This will help your cakes bake evenly and look great when stacked!
Step 7: Baking the Cake
Place the cake pans in the preheated oven. Bake for 25-30 minutes, or until a toothpick inserted into the center comes out clean. Keep an eye on them, as oven temperatures can vary. The cakes should be golden brown and spring back when lightly touched.
Step 8: Cooling and Preparing for Frosting
Once baked, remove the cakes from the oven and let them cool in the pans for about 10 minutes. Then, carefully turn them out onto a cooling rack to cool completely. This step is important because frosting a warm cake can cause the frosting to melt. Once cooled, your classic vanilla cake is ready for frosting and decorating!
With these steps, you’re well on your way to creating a delicious classic vanilla cake. Next, let’s explore some fun variations to make this cake even more exciting!
Variations of the Classic Vanilla Cake Recipe
While the classic vanilla cake is a delightful treat on its own, there are many ways to enhance its flavor and presentation. Let’s explore some fun variations that can take your cake to the next level. These ideas will not only add a twist to the traditional recipe but also impress your guests!
Adding Flavor Enhancements
One of the easiest ways to elevate your classic vanilla cake is by adding different flavors. Here are some ideas:
- Citrus Zest: Add the zest of a lemon or orange to the batter for a refreshing twist. The citrus will brighten the flavor and add a lovely aroma.
- Almond Extract: Substitute half of the vanilla extract with almond extract. This will give your cake a unique nutty flavor that pairs beautifully with vanilla.
- Cocoa Powder: For a chocolatey version, replace ½ cup of flour with cocoa powder. This will create a rich chocolate vanilla cake that everyone will love!
- Spices: Consider adding a pinch of cinnamon or nutmeg to the batter. These warm spices can add depth and warmth to the flavor profile.
These enhancements are simple yet effective. They allow you to customize your cake to suit your taste or the occasion. Feel free to experiment and find your favorite combination!
Alternative Frosting Ideas
The frosting is just as important as the cake itself! Here are some alternative frosting ideas that can complement your classic vanilla cake:
- Buttercream Frosting: A classic choice! Whip up a simple buttercream with butter, powdered sugar, and a splash of milk. You can also add flavors like chocolate or lemon for a twist.
- Cream Cheese Frosting: For a tangy flavor, try cream cheese frosting. It pairs wonderfully with vanilla cake and adds a rich, creamy texture.
- Whipped Cream: Light and fluffy whipped cream can be a perfect topping. It’s simple to make and adds a fresh touch to your cake.
- Ganache: For a decadent finish, pour chocolate ganache over the top. It creates a shiny, rich layer that will wow your guests.
These frosting options can transform your classic vanilla cake into a stunning dessert. Choose one that matches your flavor enhancements for a cohesive taste experience!
With these variations, your classic vanilla cake can become a canvas for creativity. Whether you’re adding flavors or trying new frostings, the possibilities are endless. Now, let’s move on to some important cooking notes to ensure your cake turns out perfectly every time!
Cooking Note for the Classic Vanilla Cake Recipe
When it comes to baking, a few key tips can make all the difference in achieving that perfect classic vanilla cake. Here are some essential cooking notes to keep in mind:
- Room Temperature Ingredients: Ensure that your butter, eggs, and milk are at room temperature before you start. This helps them blend together smoothly, resulting in a better texture.
- Measure Accurately: Baking is a science, so measuring your ingredients accurately is crucial. Use dry measuring cups for flour and sugar, and liquid measuring cups for milk and other liquids.
- Don’t Overmix: When combining the wet and dry ingredients, mix just until combined. Overmixing can lead to a dense cake, which is not what we want!
- Check for Doneness: Ovens can vary in temperature. Always check your cake a few minutes before the suggested baking time. Insert a toothpick in the center; if it comes out clean, your cake is ready!
- Cooling Time: Allow your cake to cool completely before frosting. This prevents the frosting from melting and ensures a beautiful finish.
By following these cooking notes, you’ll set yourself up for success in baking a classic vanilla cake that is not only delicious but also visually appealing. Remember, practice makes perfect, so don’t be discouraged if your first attempt isn’t flawless. Enjoy the process, and soon you’ll be a pro at baking this timeless treat!
Serving Suggestions for the Classic Vanilla Cake Recipe
Now that you’ve baked your classic vanilla cake, it’s time to think about how to serve it! Presentation can elevate your dessert from simple to spectacular. Here are some delightful serving suggestions that will impress your guests and make your cake the star of the show.
- Layered Delight: Slice your cake into layers and add frosting or fruit preserves between each layer. This not only looks beautiful but also adds extra flavor and texture.
- Fresh Fruits: Top your cake with fresh berries, such as strawberries, blueberries, or raspberries. The vibrant colors and natural sweetness will enhance the overall appeal.
- Chocolate Drizzle: Drizzle melted chocolate or caramel sauce over the top of your frosted cake. This adds a touch of elegance and a delicious flavor contrast.
- Ice Cream Pairing: Serve slices of your vanilla cake with a scoop of vanilla or chocolate ice cream. The combination of warm cake and cold ice cream is simply irresistible!
- Whipped Cream Topping: Add a dollop of freshly whipped cream on top of each slice. This light and airy addition complements the cake’s texture perfectly.
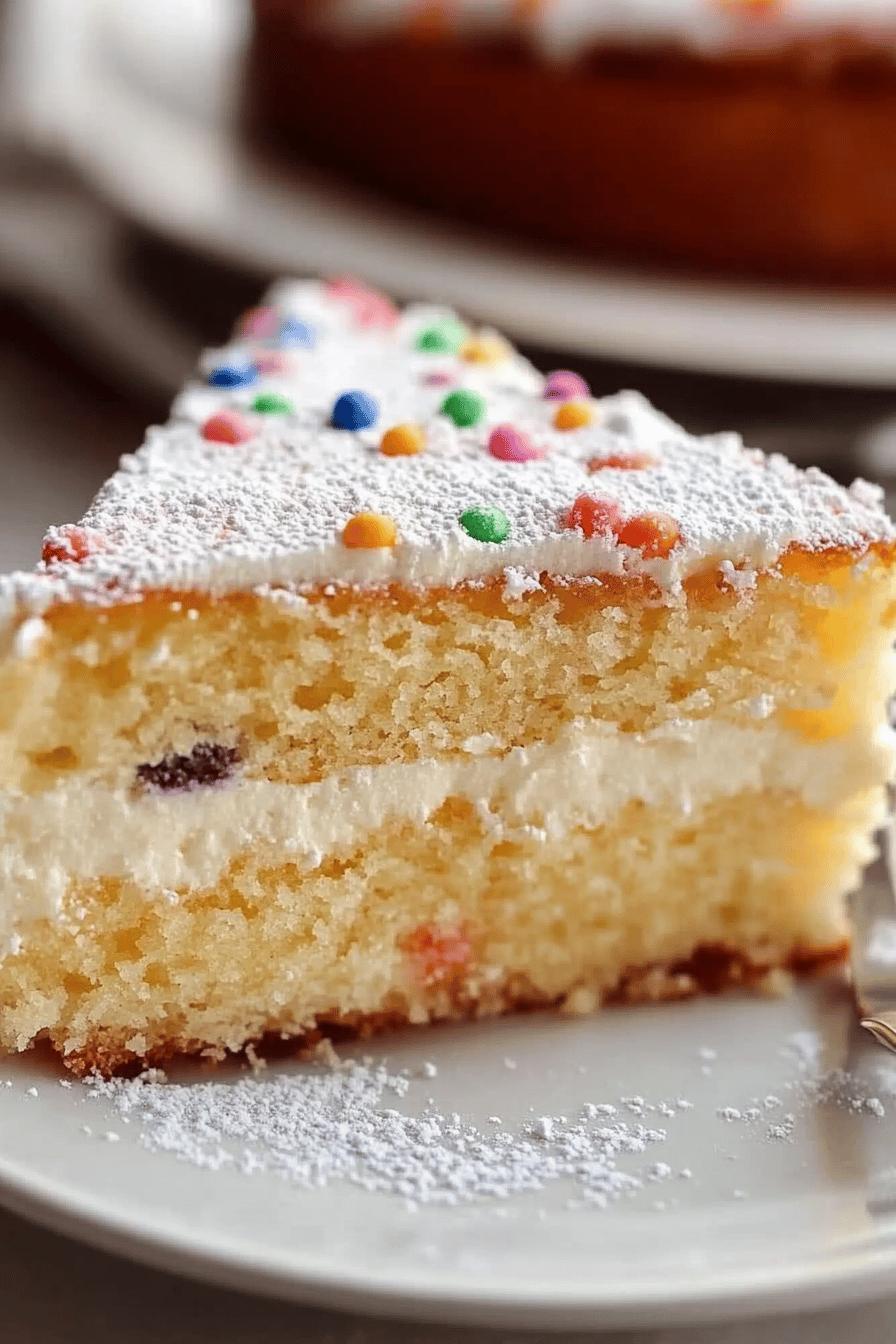
- Decorative Sprinkles: For a fun touch, sprinkle colorful edible decorations or sprinkles on top of the frosting. This is especially great for birthday celebrations!
These serving suggestions can transform your classic vanilla cake into a stunning centerpiece for any occasion. Whether it’s a birthday party, a family gathering, or just a cozy dessert at home, these ideas will make your cake even more enjoyable. Remember, the way you serve your cake can enhance the experience, so get creative and have fun with it!
Tips for Perfecting the Classic Vanilla Cake Recipe
To ensure your classic vanilla cake turns out perfectly every time, consider these helpful tips. Each suggestion is designed to enhance your baking skills and elevate your cake to new heights. With a little practice and attention to detail, you’ll be able to create a delicious masterpiece that everyone will love!
- Use Quality Ingredients: The quality of your ingredients can significantly impact the flavor of your cake. Opt for pure vanilla extract instead of imitation for a richer taste. Fresh eggs and high-quality butter will also make a noticeable difference.
- Don’t Skip the Sifting: Sifting your flour and dry ingredients helps to aerate them. This can lead to a lighter cake. It also removes any lumps, ensuring a smooth batter.
- Room Temperature Ingredients: As mentioned earlier, using room temperature ingredients is key. This allows for better mixing and a more uniform batter, resulting in a tender cake.
- Rotate Your Pans: If your oven has hot spots, consider rotating your cake pans halfway through baking. This helps ensure even baking and prevents one side from browning too quickly.
- Test for Doneness: Besides the toothpick test, gently press the top of the cake. If it springs back, it’s done! If it leaves an indentation, give it a few more minutes in the oven.
- Let It Rest: After baking, allow your cake to rest in the pan for a few minutes before transferring it to a cooling rack. This helps prevent breakage and ensures a moist texture.
- Experiment with Flavors: Don’t be afraid to try new flavors! Adding different extracts or spices can create unique variations of your classic vanilla cake. Get creative and find your favorite combinations!
By following these tips, you’ll be well on your way to mastering the classic vanilla cake recipe. Remember, baking is as much about enjoying the process as it is about the final product. So, have fun, and don’t hesitate to share your delicious creations with family and friends!
Breakdown of Time for the Classic Vanilla Cake Recipe
Understanding the time needed for each step in the classic vanilla cake recipe can help you plan your baking session better. Here’s a simple breakdown of the time you’ll need for preparation, cooking, and the total time involved in creating this delightful dessert.
Prep Time
The prep time for the classic vanilla cake is approximately 20-30 minutes. This includes gathering your ingredients, measuring them accurately, and preparing your baking tools. Taking your time during this step ensures that everything is ready for mixing, making the process smoother and more enjoyable.
Cooking Time
Once your batter is ready and poured into the pans, the cooking time is about 25-30 minutes. Keep an eye on your cakes as they bake, checking for doneness with a toothpick. Remember, every oven is different, so your cakes might bake a little faster or slower. It’s always best to check a few minutes before the suggested time!
Total Time
In total, you can expect to spend around 50-60 minutes from start to finish. This includes both prep and cooking time. Once your cakes are baked, don’t forget to allow for cooling time before frosting. This extra step is crucial for achieving a beautifully frosted cake!
With this time breakdown, you can easily plan your baking session. Whether you’re making this classic vanilla cake for a special occasion or just for fun, knowing how long each step takes will help you enjoy the process even more!
Nutritional Information for the Classic Vanilla Cake Recipe
Understanding the nutritional content of your classic vanilla cake can help you enjoy it in moderation. Here’s a breakdown of the key nutritional components per slice, assuming the cake is cut into 12 equal pieces. Keep in mind that these values can vary based on specific ingredients and portion sizes.
Calories
Each slice of classic vanilla cake contains approximately 250 calories. This makes it a delightful treat that can fit into a balanced diet. While it’s important to enjoy desserts, being mindful of portion sizes can help you indulge without overdoing it.
Protein
In terms of protein, each slice offers about 3 grams. While this isn’t a high-protein dessert, the eggs and milk contribute to this value. Protein is essential for building and repairing tissues, so every little bit counts!
Sodium
Each slice of cake contains roughly 150 milligrams of sodium. This is a moderate amount, especially considering that sodium is often found in many foods. Keeping an eye on your overall sodium intake throughout the day is a good practice, especially if you’re watching your salt consumption.
By being aware of the nutritional information, you can enjoy your classic vanilla cake while keeping your dietary goals in mind. Remember, it’s all about balance! Enjoy this delicious dessert as part of a varied and healthy diet.
FAQs about the Classic Vanilla Cake Recipe
What can I substitute for eggs in the Classic Vanilla Cake Recipe?
If you need to replace eggs in your classic vanilla cake, there are several options. One popular substitute is unsweetened applesauce. Use ¼ cup of applesauce for each egg. This will keep your cake moist and add a hint of sweetness. Another option is mashed bananas; use ¼ cup of mashed banana per egg. This will also add a slight banana flavor, which can be delightful!
You can also use flaxseed meal. Mix 1 tablespoon of flaxseed meal with 2.5 tablespoons of water, let it sit for a few minutes until it thickens, and then use it as a substitute for one egg. These alternatives work well and can help you create a delicious cake without eggs!
How can I make the Classic Vanilla Cake Recipe gluten-free?
To make your classic vanilla cake gluten-free, simply substitute the all-purpose flour with a gluten-free flour blend. Many brands offer a 1:1 gluten-free flour that can be used in place of regular flour without any adjustments. Just make sure to check the ingredients to ensure they are gluten-free.
Additionally, you can add a teaspoon of xanthan gum to help bind the ingredients together. This will give your cake the right texture and prevent it from being crumbly. With these simple changes, you can enjoy a delicious gluten-free version of this classic vanilla cake!
Can I use a different type of flour for the Classic Vanilla Cake Recipe?
Yes, you can experiment with different types of flour in your classic vanilla cake recipe! For a lighter texture, consider using cake flour instead of all-purpose flour. Cake flour has a lower protein content, which results in a softer cake.
If you want a nutty flavor, almond flour is a great option. However, since almond flour is denser, you may need to adjust the amount used. A good rule of thumb is to use about ¾ cup of almond flour for every cup of all-purpose flour. Just remember that this may change the texture and flavor slightly, but it can be a delicious twist!
How do I store leftovers of the Classic Vanilla Cake Recipe?
To store leftovers of your classic vanilla cake, first, make sure it is completely cooled. Wrap the cake tightly in plastic wrap or aluminum foil to keep it fresh. You can also place it in an airtight container. This will help prevent it from drying out.
If you want to keep it for a longer period, consider freezing the cake. Slice it into individual pieces and wrap each slice in plastic wrap, then place them in a freezer-safe bag. When you’re ready to enjoy a slice, simply thaw it at room temperature or warm it in the microwave for a few seconds. This way, you can savor your delicious cake even days after baking!
Conclusion on the Classic Vanilla Cake Recipe
In conclusion, the classic vanilla cake recipe is a timeless dessert that brings joy to any occasion. Its soft, tender crumb and delightful vanilla flavor make it a favorite among many. Whether you’re celebrating a special event or simply indulging in a sweet treat, this cake is sure to impress.
Throughout this article, we’ve explored the essential ingredients, step-by-step preparation, and various ways to enhance your cake. From adding flavor enhancements to trying out different frostings, the possibilities are endless. Remember, baking is not just about following a recipe; it’s about expressing your creativity and enjoying the process.
As you embark on your baking journey, keep in mind the tips and cooking notes shared here. They will help you achieve the perfect classic vanilla cake every time. Don’t hesitate to experiment with flavors and decorations to make the cake your own. After all, the best part of baking is sharing your delicious creations with family and friends.
So, gather your ingredients, preheat your oven, and get ready to create a delightful masterpiece in your kitchen. With this classic vanilla cake recipe, you’re not just baking a cake; you’re making memories that will last a lifetime. Happy baking!
Relevant Recipes Link: