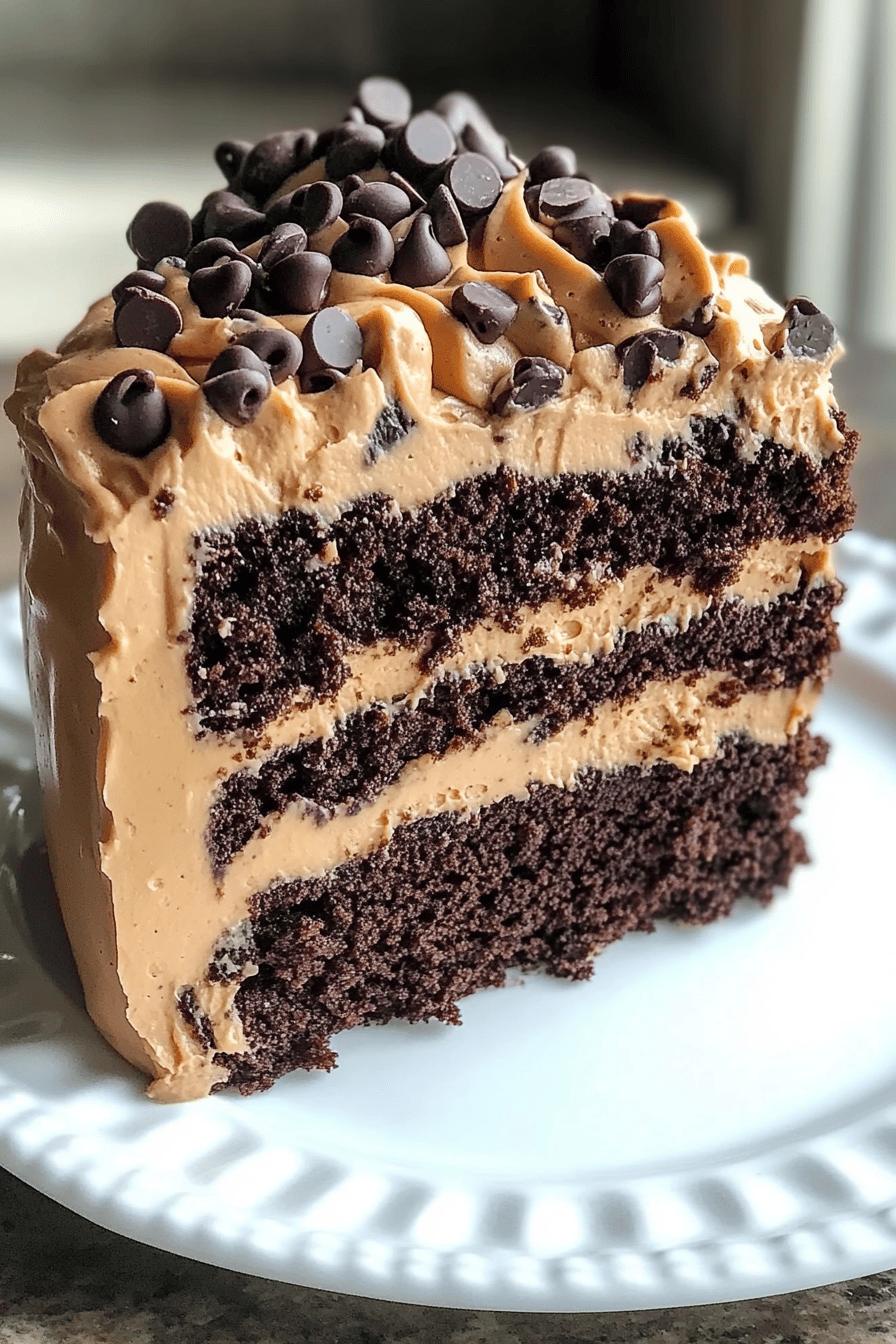
Introduction to Chocolate Peanut Butter Dream Cake
The Allure of Chocolate and Peanut Butter
Chocolate and peanut butter are a match made in dessert heaven. The rich, velvety taste of chocolate pairs perfectly with the creamy, nutty flavor of peanut butter. Together, they create a delightful balance that tantalizes the taste buds. This combination is not just popular; it’s beloved by many. From candies to cookies, the duo has captured hearts and cravings alike. Imagine sinking your fork into a slice of cake that embodies this perfect partnership. It’s a treat that promises to satisfy your sweet tooth and leave you wanting more!
Why You Should Try This Recipe
This Chocolate Peanut Butter Dream Cake is more than just a dessert; it’s an experience. Each bite offers a moist chocolate layer that melts in your mouth, complemented by a luscious peanut butter frosting that’s simply irresistible. Whether you’re celebrating a birthday, hosting a gathering, or just treating yourself, this cake is sure to impress. Plus, it’s easy to make! With simple ingredients and straightforward steps, you can whip up this indulgent cake in no time. So, why not give it a try? You’ll be glad you did!
Ingredients for Chocolate Peanut Butter Dream Cake
To create this delightful Chocolate Peanut Butter Dream Cake, you’ll need a few key ingredients. Each component plays a vital role in achieving that perfect balance of flavors. Here’s what you’ll need:
For the Chocolate Cake Layers:
- 1 ¾ cups all-purpose flour
- 1 ½ cups granulated sugar
- ¾ cup unsweetened cocoa powder
- 1 ½ teaspoons baking powder
- 1 ½ teaspoons baking soda
- 1 teaspoon salt
- 2 large eggs
- 1 cup whole milk
- ½ cup vegetable oil
- 2 teaspoons vanilla extract
- 1 cup boiling water
For the Peanut Butter Frosting:
- 1 cup creamy peanut butter
- ½ cup unsalted butter, softened
- 3 cups powdered sugar
- ¼ cup heavy cream
- 1 teaspoon vanilla extract
For the Chocolate Drizzle and Toppings:
- ½ cup semi-sweet chocolate chips
- 1 tablespoon vegetable oil
- Extra chocolate chips for garnish (optional)
Gather these ingredients, and you’re ready to embark on your baking adventure! Each item contributes to the cake’s rich flavor and delightful texture. So, let’s get started on making this scrumptious dessert!
Step-by-Step Preparation of Chocolate Peanut Butter Dream Cake
Step 1: Preparing the Chocolate Cake Layers
Let’s kick off this delicious journey by making the chocolate cake layers. First, preheat your oven to 350°F (175°C). This ensures your cake bakes evenly. Next, grab two 9-inch round cake pans and grease them lightly with butter or cooking spray. This will help the cakes come out easily.
In a large mixing bowl, combine the flour, sugar, cocoa powder, baking powder, baking soda, and salt. Whisk these dry ingredients together until they are well mixed. Then, add the eggs, milk, vegetable oil, and vanilla extract. Mix everything together on medium speed for about 2 minutes. The batter will be smooth and creamy.
Now, carefully stir in the boiling water. This step makes the batter thin, but don’t worry! It’s supposed to be that way. Pour the batter evenly into the prepared cake pans. Bake in the preheated oven for 30 to 35 minutes. You’ll know they’re done when a toothpick inserted in the center comes out clean. Once baked, let the cakes cool in the pans for 10 minutes before transferring them to a wire rack to cool completely.
Step 2: Making the Luscious Peanut Butter Frosting
While the cake layers cool, it’s time to whip up that creamy peanut butter frosting. In a large bowl, beat the softened butter and peanut butter together until they are smooth and fluffy. This usually takes about 2 minutes. Next, gradually add the powdered sugar, mixing on low speed to avoid a sugary cloud!
Once the sugar is incorporated, pour in the heavy cream and vanilla extract. Beat the mixture on medium speed until it’s light and fluffy. If the frosting seems too thick, add a little more cream until you reach your desired consistency. Taste it—if you love peanut butter, you’re in for a treat!
Step 3: Assembling the Cake
Now comes the fun part—putting it all together! Start by placing one chocolate cake layer on a serving plate. Spread a generous amount of peanut butter frosting on top. Make sure to cover it evenly. Then, gently place the second cake layer on top. This creates a beautiful two-layer cake.
Once the layers are stacked, use the remaining frosting to cover the top and sides of the cake. Don’t worry about making it perfect; a little rustic charm adds to the cake’s appeal. You can use a spatula or a knife to create swirls and peaks in the frosting for a lovely finish.
Step 4: Adding the Chocolate Drizzle and Toppings
To make your cake even more irresistible, let’s add a chocolate drizzle! In a microwave-safe bowl, combine the semi-sweet chocolate chips and vegetable oil. Microwave in 30-second intervals, stirring in between, until the chocolate is melted and smooth.
Once melted, drizzle the chocolate over the top of the frosted cake. You can use a spoon or a piping bag for more control. Finally, sprinkle extra chocolate chips on top for that extra touch of decadence. Your Chocolate Peanut Butter Dream Cake is now ready to impress!
Variations of Chocolate Peanut Butter Dream Cake
Gluten-Free Options
If you or your guests are gluten-sensitive, don’t worry! You can still enjoy this delicious Chocolate Peanut Butter Dream Cake. Simply swap out the all-purpose flour for a gluten-free flour blend. Many brands offer a 1:1 gluten-free flour that works perfectly in baking. Just make sure to check the ingredients to ensure they are gluten-free. Additionally, you can add a teaspoon of xanthan gum to help with the cake’s structure. This way, you can indulge in the same rich flavors without any gluten concerns!
Alternative Frosting Ideas
While the peanut butter frosting is a star in this recipe, you can get creative with different frosting options! For a lighter touch, consider using whipped cream or a cream cheese frosting. Both options will add a delightful twist to the cake. If you want to keep the peanut butter flavor but change the texture, try a peanut butter cream cheese frosting. Just mix equal parts of cream cheese and peanut butter, then add powdered sugar and vanilla to taste. This variation will give you a tangy yet creamy frosting that pairs beautifully with the chocolate layers!
Cooking Note for Chocolate Peanut Butter Dream Cake
When it comes to baking, a few key tips can make all the difference in achieving the perfect Chocolate Peanut Butter Dream Cake. First, always measure your ingredients accurately. Using a kitchen scale can help ensure precision, especially with flour and sugar. Too much or too little can affect the cake’s texture and flavor.
Next, make sure your ingredients are at room temperature before you start mixing. This includes eggs, milk, and butter. Room temperature ingredients blend more easily, resulting in a smoother batter. Additionally, don’t skip the step of greasing your cake pans. This simple action prevents the cake from sticking, allowing for a clean release once baked.
Another important note is to avoid overmixing your batter. Once you combine the wet and dry ingredients, mix just until everything is incorporated. Overmixing can lead to a dense cake, which is not what we want for this light and fluffy dessert.
Lastly, keep an eye on your baking time. Ovens can vary, so start checking your cakes a few minutes before the recommended time. A toothpick inserted into the center should come out clean or with a few moist crumbs. If you notice the edges pulling away from the pan, it’s a good sign that your cake is ready!
By following these cooking notes, you’ll set yourself up for success in creating a delightful Chocolate Peanut Butter Dream Cake that’s sure to impress everyone at your gathering!
Serving Suggestions for Chocolate Peanut Butter Dream Cake
Perfect Pairings with Beverages
When it comes to enjoying your Chocolate Peanut Butter Dream Cake, the right beverage can elevate the experience. A classic choice is a tall glass of cold milk. The creamy texture of milk complements the rich flavors of chocolate and peanut butter beautifully. If you prefer something warm, a cup of coffee or hot chocolate can also be delightful. The bitterness of coffee balances the sweetness of the cake, while hot chocolate adds an extra layer of chocolatey goodness.
For those looking for a refreshing option, consider pairing the cake with a fruity iced tea or lemonade. The citrus notes in lemonade can cut through the richness of the cake, providing a refreshing contrast. Additionally, a scoop of vanilla ice cream on the side can turn this dessert into an even more indulgent treat. The cold ice cream melts into the warm cake, creating a deliciously creamy combination!
Ideal Occasions for Serving
This Chocolate Peanut Butter Dream Cake is perfect for a variety of occasions. Whether you’re celebrating a birthday, hosting a family gathering, or simply enjoying a cozy night in, this cake fits the bill. Its rich flavors make it a standout dessert for special events, like anniversaries or holiday parties. You can even serve it at potlucks or bake sales, where it’s sure to be a crowd-pleaser!
Additionally, this cake can be a delightful treat for casual get-togethers with friends. Imagine sharing slices of this decadent cake over coffee or tea, sparking joy and conversation. It’s also a fantastic choice for movie nights or game nights, adding a sweet touch to your fun-filled evenings. No matter the occasion, this cake is bound to bring smiles and satisfaction to everyone who tries it!
Tips for Perfecting Your Chocolate Peanut Butter Dream Cake
Baking Tips for Moist Cake Layers
To achieve the perfect moist chocolate cake layers, there are a few essential tips to keep in mind. First, always use fresh ingredients. Expired baking powder or baking soda can lead to a dense cake. Next, consider using room temperature ingredients. Eggs and milk blend better when they’re not cold, resulting in a lighter texture.
Another key tip is to avoid overmixing your batter. Once you combine the wet and dry ingredients, mix just until everything is incorporated. Overmixing can develop gluten, making the cake tough instead of tender. Also, remember to check your oven temperature with an oven thermometer. Sometimes, ovens can be off by a few degrees, affecting your baking time.
Lastly, don’t forget to let your cakes cool completely before frosting. If the layers are warm, the frosting can melt and slide off, ruining your beautiful creation. By following these baking tips, you’ll ensure that your Chocolate Peanut Butter Dream Cake layers are moist, fluffy, and utterly delicious!
Frosting Tips for a Smooth Finish
When it comes to frosting your cake, a smooth finish can make all the difference. Start by ensuring your peanut butter frosting is at the right consistency. If it’s too thick, add a little more heavy cream until it’s spreadable. Conversely, if it’s too thin, you can add more powdered sugar to thicken it up.
Before frosting, make sure your cake layers are completely cool. This prevents the frosting from melting and helps achieve a clean look. To create a smooth finish, use an offset spatula or a bench scraper. Start by applying a thin layer of frosting to seal in any crumbs. This is called a crumb coat. Chill the cake for about 30 minutes to set this layer.
After chilling, apply a thicker layer of frosting over the crumb coat. Use the spatula to smooth it out, and don’t be afraid to add some swirls or peaks for a rustic look. If you want a polished finish, dip your spatula in hot water, wipe it dry, and gently smooth the frosting. This technique helps create a beautiful, professional-looking cake. With these frosting tips, your Chocolate Peanut Butter Dream Cake will not only taste amazing but also look stunning!
Breakdown of Time for Chocolate Peanut Butter Dream Cake
Prep Time
Getting ready to bake your Chocolate Peanut Butter Dream Cake is a breeze! The prep time for this delightful dessert is approximately 20 to 30 minutes. During this time, you’ll gather all your ingredients, measure them out, and mix the batter for the chocolate cake layers. It’s a fun and straightforward process that sets the stage for your baking adventure!
Cooking Time
Once your cake batter is ready, it’s time to bake! The cooking time for the chocolate cake layers is about 30 to 35 minutes. Keep an eye on your cakes as they bake, and remember to check for doneness with a toothpick. When it comes out clean or with a few moist crumbs, your cakes are ready to cool!
Total Time
In total, you can expect to spend around 1 hour to 1 hour and 15 minutes on your Chocolate Peanut Butter Dream Cake. This includes both prep and cooking time. After baking, don’t forget to allow your cakes to cool completely before frosting. With a little patience, you’ll have a stunning cake that’s worth every minute spent in the kitchen!
Nutritional Information for Chocolate Peanut Butter Dream Cake
Calories
When indulging in a slice of Chocolate Peanut Butter Dream Cake, it’s good to know what you’re enjoying. Each slice contains approximately 450 calories. This number can vary based on portion size and specific ingredients used. While this cake is a treat, it’s important to enjoy it in moderation, especially if you’re watching your calorie intake. Remember, a little indulgence can go a long way in satisfying your sweet cravings!
Protein
Protein is an essential nutrient, and this cake offers a decent amount. Each slice provides about 7 grams of protein. The protein comes from ingredients like eggs and peanut butter, which not only add flavor but also contribute to the cake’s nutritional value. While this isn’t a high-protein dessert, it does help balance the sweetness and adds a bit of sustenance to your treat!
Sodium
For those monitoring their sodium intake, it’s helpful to know that each slice of Chocolate Peanut Butter Dream Cake contains around 300 milligrams of sodium. This amount is fairly standard for desserts, especially those that include baking powder and salt. If you’re concerned about sodium, consider enjoying a smaller slice or pairing it with a low-sodium beverage to balance your meal.
Overall, while this cake is a delightful indulgence, being aware of its nutritional content can help you enjoy it responsibly. So go ahead, treat yourself to a slice of this dreamy dessert, and savor every bite!
FAQs about Chocolate Peanut Butter Dream Cake
Can I make this cake ahead of time?
Absolutely! You can make the Chocolate Peanut Butter Dream Cake ahead of time. In fact, it often tastes even better after sitting for a day, as the flavors meld together beautifully. To prepare in advance, bake the cake layers and let them cool completely. Then, wrap each layer tightly in plastic wrap and store them in the refrigerator for up to 2 days. You can also freeze the layers for up to a month. Just remember to thaw them in the fridge before frosting. This way, you can enjoy a delicious cake without the last-minute rush!
How should I store leftover cake?
Storing leftover Chocolate Peanut Butter Dream Cake is simple! If you have any slices left, place them in an airtight container. This helps keep the cake moist and fresh. You can store it at room temperature for up to 3 days. If you want to keep it longer, consider refrigerating it. Just be sure to let it come to room temperature before serving for the best flavor and texture. If you have a lot of leftovers, you can also freeze individual slices. Wrap them tightly in plastic wrap and then place them in a freezer-safe bag. They’ll stay delicious for up to 3 months!
Can I substitute ingredients in this recipe?
Yes, you can definitely substitute ingredients in this recipe! If you need a gluten-free option, use a gluten-free flour blend instead of all-purpose flour. For a dairy-free version, swap the milk with almond milk or coconut milk, and use dairy-free butter for the frosting. If you prefer a different nut butter, feel free to use almond butter or cashew butter in place of peanut butter. Just keep in mind that these substitutions may slightly alter the flavor and texture of the cake, but it will still be delicious!
What is the best way to serve this cake?
The best way to serve your Chocolate Peanut Butter Dream Cake is to slice it into generous pieces and present it on a beautiful cake stand. For an extra touch, you can dust the top with cocoa powder or sprinkle some chopped peanuts for added crunch. Pair each slice with a scoop of vanilla ice cream or a dollop of whipped cream for a delightful contrast. If you’re feeling fancy, drizzle some extra chocolate sauce over the top. This cake is perfect for any occasion, so don’t hesitate to serve it at parties, gatherings, or even just a cozy night in!
Conclusion on Chocolate Peanut Butter Dream Cake
Final Thoughts on This Decadent Dessert
In conclusion, the Chocolate Peanut Butter Dream Cake is truly a dessert that stands out. Its rich chocolate layers combined with creamy peanut butter frosting create a delightful experience for anyone who takes a bite. This cake is not just about taste; it’s about the joy it brings to gatherings and celebrations. Whether you’re sharing it with friends or enjoying a slice on your own, this cake is sure to make any moment special. The combination of flavors and textures makes it a memorable treat that will have everyone asking for seconds!
Encouragement to Try the Recipe
If you haven’t yet tried making this Chocolate Peanut Butter Dream Cake, now is the perfect time! With simple ingredients and easy-to-follow steps, you can create a dessert that impresses. Don’t be afraid to get creative with variations or pairings. Remember, baking is all about having fun and experimenting. So gather your ingredients, roll up your sleeves, and dive into this delicious adventure. You won’t regret it! Enjoy every moment of baking and, of course, every delicious bite of your cake!