Introduction to Old Fashioned Chocolate Pie
The Allure of Old Fashioned Chocolate Pie
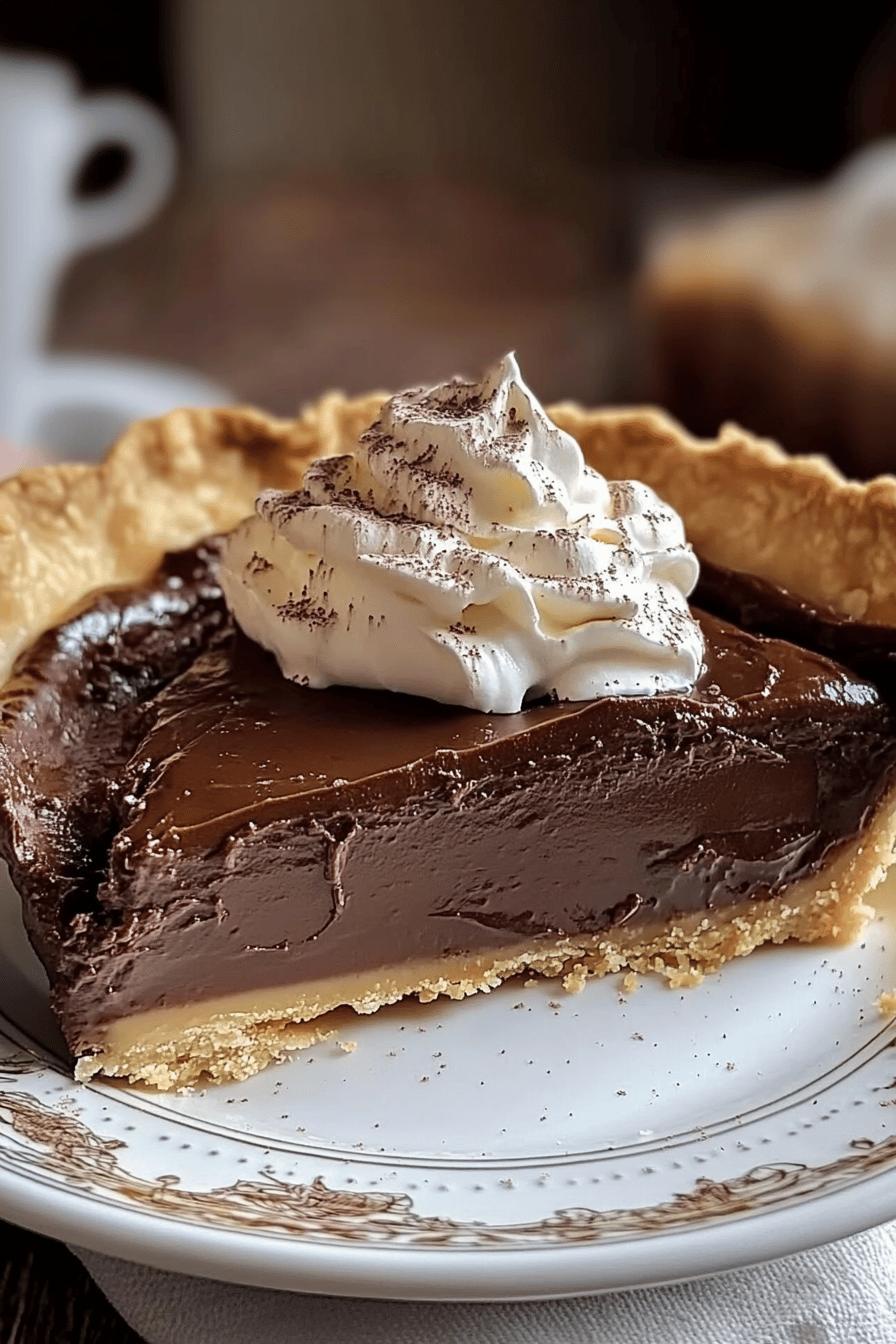
There’s something magical about an old-fashioned chocolate pie. It brings back memories of family gatherings and cozy evenings. The rich, velvety filling paired with a flaky crust creates a delightful experience for your taste buds. Each bite is a sweet reminder of simpler times, making it a beloved dessert for many. The allure of this pie lies not just in its taste but also in the nostalgia it evokes. Whether you’re sharing it with loved ones or enjoying a slice alone, this pie is sure to bring a smile to your face.
Why This Recipe is a Must-Try
This old-fashioned chocolate pie recipe is a must-try for several reasons. First, it’s incredibly easy to make, even for beginners. With just a few simple ingredients, you can whip up a dessert that looks and tastes like it came from a bakery. Second, the combination of rich cocoa and creamy filling is simply irresistible. It’s a dessert that appeals to chocolate lovers of all ages. Lastly, this pie is versatile. You can serve it at family gatherings, birthday parties, or even as a comforting treat after a long day. Trust us, once you try this recipe, it will become a staple in your dessert repertoire!
Ingredients for Old Fashioned Chocolate Pie
To create your delicious old-fashioned chocolate pie, you’ll need a few simple ingredients. Each one plays a vital role in achieving that rich, chocolatey flavor and smooth texture. Here’s what you’ll need:
- 1 pre-made pie crust (store-bought or homemade)
- 1 cup granulated sugar
- 1/3 cup unsweetened cocoa powder
- 1/4 cup cornstarch
- 1/4 teaspoon salt
- 2 3/4 cups milk
- 3 large egg yolks
- 2 tablespoons unsalted butter
- 1 teaspoon vanilla extract
These ingredients come together to create a luscious filling that will have everyone coming back for more. The pre-made pie crust saves time, making this recipe even more accessible. If you prefer, you can opt for a homemade crust, which adds a personal touch. Either way, the result will be a delightful dessert that’s sure to impress!
Step-by-Step Preparation of Old Fashioned Chocolate Pie
Step 1: Preparing the Crust
First things first, let’s get that crust ready! If you’re using a pre-made pie crust, simply take it out of the package and place it in a pie dish. Make sure to press it gently against the sides and bottom. If you’re feeling adventurous and want to make your own crust, roll out your dough and fit it into the dish. Don’t forget to poke a few holes in the bottom with a fork. This helps prevent bubbling while baking. Once your crust is ready, set it aside while you prepare the filling.
Step 2: Making the Cocoa Filling
Now, let’s dive into the delicious cocoa filling! In a medium saucepan, combine the granulated sugar, unsweetened cocoa powder, cornstarch, and salt. Whisk these dry ingredients together until they are well mixed. Next, slowly pour in the milk while continuing to whisk. This will help avoid any lumps. Place the saucepan over medium heat and cook the mixture, stirring constantly. You’ll notice it thickening as it heats up. Once it starts to bubble, remove it from the heat.
In a separate bowl, beat the egg yolks. Gradually add a small amount of the hot cocoa mixture to the egg yolks, whisking quickly to temper them. This step is crucial to prevent the eggs from scrambling. After that, pour the egg mixture back into the saucepan with the remaining cocoa filling. Return it to the heat and cook for another minute, stirring until it’s thick and creamy. Finally, stir in the unsalted butter and vanilla extract until fully melted and combined.
Step 3: Assembling the Pie
With your filling ready, it’s time to assemble the pie! Pour the warm cocoa filling into the prepared pie crust. Use a spatula to spread it evenly, ensuring every corner is filled. The filling should be smooth and glossy. Once it’s all in, gently tap the pie dish on the counter to release any air bubbles. This will help create a beautiful, even surface for your pie.
Step 4: Baking the Pie
Now, let’s bake that pie! Preheat your oven to 350°F (175°C). Place the assembled pie on a baking sheet to catch any drips. Bake it in the preheated oven for about 30 to 35 minutes. You’ll know it’s done when the filling is set but still slightly jiggly in the center. Don’t worry; it will firm up as it cools. Once baked, remove the pie from the oven and let it cool on a wire rack.
Step 5: Cooling and Serving
After baking, it’s important to let your pie cool completely. This usually takes about 2 hours at room temperature. Once cooled, you can refrigerate it for a few hours if you prefer a chilled dessert. When you’re ready to serve, slice the pie into wedges. You can enjoy it plain or top it with whipped cream or a scoop of ice cream for an extra treat. Your old-fashioned chocolate pie is now ready to be devoured!
Variations of Old Fashioned Chocolate Pie
Adding a Twist: Flavor Variations
While the classic old-fashioned chocolate pie is delicious on its own, you can easily add a twist to make it even more exciting! Here are some fun flavor variations to consider:
- Mint Chocolate Pie: Add a few drops of peppermint extract to the cocoa filling for a refreshing minty flavor. This variation is perfect for the holidays!
- Peanut Butter Chocolate Pie: Swirl in some creamy peanut butter into the filling before pouring it into the crust. The combination of chocolate and peanut butter is simply irresistible.
- Espresso Chocolate Pie: For coffee lovers, mix in a tablespoon of instant espresso powder with the cocoa. This will enhance the chocolate flavor and add a delightful coffee kick.
- Chocolate Hazelnut Pie: Stir in some hazelnut spread into the filling for a nutty twist. You can also sprinkle chopped hazelnuts on top for added crunch.
These variations allow you to customize your pie to suit your taste or the occasion. Feel free to experiment and find your favorite flavor combination!
Alternative Crust Options
If you want to switch things up, consider trying different crust options for your old-fashioned chocolate pie. Here are a few ideas:
- Graham Cracker Crust: For a no-bake option, use crushed graham crackers mixed with melted butter. Press the mixture into a pie dish and chill until firm. This crust adds a sweet, crunchy texture.
- Chocolate Cookie Crust: Crush chocolate sandwich cookies and mix them with melted butter. This crust enhances the chocolate flavor and gives a rich, decadent base.
- Almond Flour Crust: For a gluten-free option, use almond flour mixed with coconut oil and a bit of sweetener. This crust is nutty and pairs well with the chocolate filling.
- Shortbread Crust: A buttery shortbread crust can add a delightful crumbly texture. Simply mix flour, sugar, and butter, then press it into the pie dish before baking.
These alternative crust options can elevate your old-fashioned chocolate pie, making it unique and delicious. Choose one that suits your taste or dietary needs, and enjoy a delightful twist on this classic dessert!
Cooking Note for Old Fashioned Chocolate Pie
When making your old-fashioned chocolate pie, a few cooking notes can help ensure your dessert turns out perfectly every time. First, pay attention to the temperature of your ingredients. Using room temperature eggs and milk can help the filling blend more smoothly, resulting in a creamier texture. Additionally, when cooking the cocoa filling, stir constantly to prevent it from sticking to the bottom of the saucepan. This will help avoid any burnt bits that could affect the flavor.
Another important tip is to allow the pie to cool completely before slicing. This cooling time helps the filling set properly, making it easier to cut clean slices. If you’re in a hurry, you can place the pie in the refrigerator to speed up the cooling process. However, be sure to cover it with plastic wrap to prevent it from absorbing any odors from the fridge.
Lastly, don’t hesitate to taste your filling before pouring it into the crust. This is your chance to adjust the sweetness or add more vanilla if desired. Remember, cooking is all about personal preference, and this pie should reflect your taste. With these cooking notes in mind, you’ll be well on your way to creating a delightful old-fashioned chocolate pie that everyone will love!
Serving Suggestions for Old Fashioned Chocolate Pie
Pairing with Ice Cream or Whipped Cream
When it comes to serving your old-fashioned chocolate pie, the right toppings can elevate the experience. One of the most popular choices is to pair it with a scoop of ice cream. Vanilla ice cream is a classic option, as its creamy texture complements the rich chocolate filling perfectly. The cold ice cream contrasts beautifully with the warm pie, creating a delightful treat.
If you prefer something lighter, whipped cream is another fantastic choice. A dollop of freshly whipped cream adds a fluffy texture that balances the pie’s richness. You can even add a sprinkle of cocoa powder or chocolate shavings on top for an extra touch of elegance. For a fun twist, consider flavored whipped cream, such as vanilla or mint, to enhance the overall taste.
For those who enjoy a bit of crunch, try adding crushed nuts or toffee bits on top of your pie. This adds a delightful texture and a burst of flavor that pairs wonderfully with the chocolate. No matter how you choose to serve it, your old-fashioned chocolate pie will be a hit!
Presentation Ideas for Special Occasions
Presentation is key when serving your old-fashioned chocolate pie, especially for special occasions. Here are some creative ideas to make your dessert stand out:
- Garnish with Fresh Berries: Adding fresh raspberries or strawberries on the side not only adds a pop of color but also a refreshing taste that complements the chocolate.
- Chocolate Drizzle: Drizzle melted chocolate over the top of the pie or around the plate for a professional touch. This adds visual appeal and enhances the chocolate flavor.
- Use Decorative Plates: Serve your pie on beautiful dessert plates or platters. A nice presentation can make even the simplest dessert feel special.
- Top with Edible Flowers: For a unique and elegant touch, consider garnishing with edible flowers. They add a beautiful visual element and can impress your guests.
By incorporating these presentation ideas, you can turn your old-fashioned chocolate pie into a stunning centerpiece for any gathering. Whether it’s a birthday party, holiday celebration, or a cozy family dinner, your pie will not only taste amazing but also look fabulous!
Tips for Perfecting Your Old Fashioned Chocolate Pie
Common Mistakes to Avoid
Making an old-fashioned chocolate pie can be a delightful experience, but there are a few common mistakes to watch out for. First, be careful not to overcook the filling. It should be thick but still slightly jiggly when you take it out of the oven. Overcooking can lead to a dry texture, which is not what you want!
Another mistake is not whisking the dry ingredients thoroughly before adding the milk. This can result in lumps in your filling. Always take the time to mix them well. Also, remember to temper the egg yolks properly. If you add them too quickly to the hot mixture, they can scramble, ruining the smooth texture of your pie.
Lastly, don’t skip the cooling time! Allowing the pie to cool completely helps it set properly. If you slice it too soon, the filling may ooze out, making it messy. Patience is key to achieving that perfect slice!
Storage Tips for Leftovers
If you find yourself with leftover old-fashioned chocolate pie, don’t worry! Proper storage can keep it fresh and delicious. First, cover the pie with plastic wrap or aluminum foil to prevent it from drying out. You can also place it in an airtight container for added protection.
Store the pie in the refrigerator, where it can last for about 3 to 4 days. If you want to keep it longer, consider freezing it. To freeze, wrap individual slices in plastic wrap and then place them in a freezer-safe bag. This way, you can enjoy a slice whenever the craving hits!
When you’re ready to eat the frozen pie, simply thaw it in the refrigerator overnight. You can also warm it up in the microwave for a few seconds if you prefer it warm. With these storage tips, you can savor your old-fashioned chocolate pie for days to come!
Breakdown of Time for Old Fashioned Chocolate Pie
Prep Time
Preparing your old-fashioned chocolate pie is a breeze! The prep time typically takes about 20 to 30 minutes. This includes gathering your ingredients, preparing the crust, and making the cocoa filling. If you’re using a pre-made crust, you’ll save even more time. Just remember to have everything ready before you start, so the process goes smoothly!
Cooking Time
The cooking time for your pie is around 30 to 35 minutes. During this time, the filling will thicken and set beautifully in the oven. Keep an eye on it to ensure it doesn’t overcook. You want that perfect balance of a firm filling that still has a slight jiggle in the center. This is what makes the pie so delightful!
Total Time
In total, you can expect to spend about 1 hour to 1 hour and 5 minutes from start to finish. This includes both prep and cooking time. However, don’t forget to factor in the cooling time! After baking, let your pie cool for at least 2 hours before serving. This allows the filling to set properly, ensuring you get those perfect slices. So, while the active time is short, the wait is well worth it for that delicious old-fashioned chocolate pie!
Nutritional Information for Old Fashioned Chocolate Pie
Calories
When indulging in a slice of old-fashioned chocolate pie, it’s good to know what you’re enjoying. On average, one slice of this delightful pie contains about 300 to 350 calories. This number can vary based on the specific ingredients used, especially if you opt for a homemade crust or add toppings like whipped cream or ice cream. While it’s a treat, it’s important to enjoy it in moderation, especially if you’re watching your calorie intake.
Protein
Each slice of old-fashioned chocolate pie provides approximately 5 to 7 grams of protein. The protein mainly comes from the eggs and milk used in the filling. While this isn’t a high-protein dessert, it does contribute a small amount to your daily intake. Pairing your pie with a scoop of ice cream can also boost the protein content, making it a more balanced treat.
Sodium
In terms of sodium, a slice of old-fashioned chocolate pie typically contains around 150 to 200 milligrams. This amount can vary depending on the specific ingredients and whether you use salted or unsalted butter. If you’re watching your sodium intake, consider using unsalted butter and keeping an eye on any additional toppings that may add extra salt. Overall, this pie can fit into a balanced diet when enjoyed occasionally.
FAQs about Old Fashioned Chocolate Pie
Can I use a homemade crust instead of a pre-made one?
Absolutely! Using a homemade crust can add a personal touch to your old-fashioned chocolate pie. If you enjoy baking, making your own crust allows you to customize the flavor and texture. Just follow your favorite pie crust recipe, and make sure to roll it out thinly for the best results. A homemade crust can enhance the overall taste of your pie, making it even more special!
How do I store leftover chocolate pie?
Storing leftover old-fashioned chocolate pie is simple! First, cover the pie with plastic wrap or aluminum foil to keep it fresh. You can also place it in an airtight container. Store it in the refrigerator, where it will stay good for about 3 to 4 days. If you want to keep it longer, consider freezing individual slices. Just wrap them in plastic wrap and place them in a freezer-safe bag. This way, you can enjoy a slice whenever you crave it!
Can I make this pie ahead of time?
Yes, you can definitely make your old-fashioned chocolate pie ahead of time! In fact, making it a day in advance can enhance the flavors as they meld together. Just prepare the pie, bake it, and let it cool completely. Then, cover it and store it in the refrigerator until you’re ready to serve. This makes it a great option for parties or family gatherings, allowing you to enjoy the moment without the stress of last-minute baking!
What can I substitute for cocoa powder?
If you find yourself without cocoa powder, don’t worry! You can substitute it with unsweetened carob powder, which has a similar flavor profile. However, keep in mind that carob is naturally sweeter, so you may want to reduce the sugar in your recipe slightly. Another option is to use dark chocolate. Melt about 4 ounces of dark chocolate and replace the cocoa powder with it. This will give your pie a rich, chocolatey flavor that’s sure to impress!
Conclusion: Enjoying Your Old Fashioned Chocolate Pie
In conclusion, the old-fashioned chocolate pie is more than just a dessert; it’s a delightful experience that brings joy to any occasion. With its rich cocoa filling and flaky crust, this pie is a timeless treat that appeals to chocolate lovers everywhere. Whether you’re serving it at a family gathering, a birthday party, or simply enjoying a slice at home, it’s sure to be a hit.
As you savor each bite, take a moment to appreciate the effort you put into creating this delicious masterpiece. Remember, cooking is not just about following a recipe; it’s about sharing love and joy through food. So, don’t hesitate to experiment with flavors and toppings to make this pie your own. The variations are endless, and each twist can lead to a new favorite!
Finally, don’t forget to share your old-fashioned chocolate pie with friends and family. Watching their faces light up with delight as they take their first bite is one of the best rewards of baking. So, gather your loved ones, slice up that pie, and enjoy the sweet moments together. Happy baking!
Relevant Recipes Link:
Craving more delectable recipes? Indulge in these must-try dishes:
- Old-Fashioned Southern Pound Cake: A Classic Delight
- Gooey Raspberry White Chocolate Cookies: Irresistible Sweet Treat
- Discover more mouthwatering recipes here!
For a plethora of recipes and culinary inspiration, follow us on Pinterest!