Introduction to Homemade Vanilla Custard Ice Cream
What Makes Homemade Vanilla Custard Ice Cream Special?
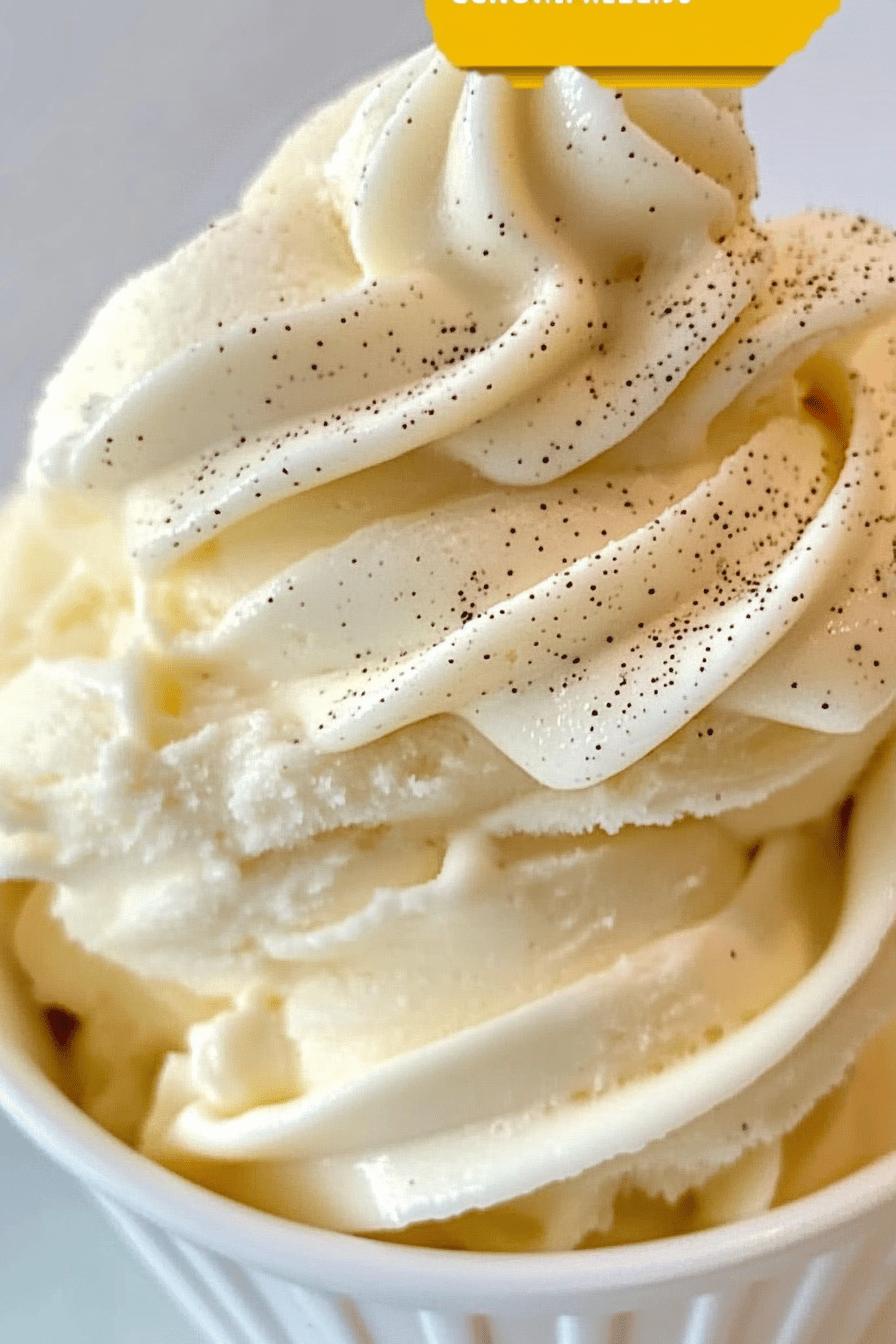
Homemade vanilla custard ice cream is a delightful treat that stands out for many reasons. First, it’s made with fresh, high-quality ingredients. You can taste the difference when you use real vanilla beans, heavy cream, and egg yolks. This combination creates a rich and creamy texture that store-bought ice creams often lack. Plus, making it at home allows you to control the sweetness and flavor intensity, ensuring it’s just right for your taste buds.
Another special aspect is the process itself. Crafting ice cream from scratch is a rewarding experience. You get to watch the transformation from simple ingredients into a luscious dessert. The joy of making your own ice cream is not just in the final product but also in the journey of creating it. Each step is filled with anticipation, and the end result is a creamy delight that you can proudly serve to family and friends.
The Joy of Making Ice Cream at Home
There’s something magical about making ice cream at home. It’s a fun activity that can bring family and friends together. Whether you’re teaching your kids how to whisk the egg yolks or sharing a laugh while waiting for the mixture to chill, the process is filled with joy. Plus, you can customize your ice cream to suit everyone’s preferences. Want to add chocolate chips? Go for it! Prefer a hint of mint? Why not!
Making ice cream at home also allows you to experiment with flavors and textures. You can try different mix-ins or even create unique flavor combinations. The possibilities are endless! This creativity not only makes the ice cream more enjoyable but also adds a personal touch to your dessert. So, gather your ingredients and get ready to embark on a delicious adventure in your kitchen!
Ingredients for Homemade Vanilla Custard Ice Cream
To create your own homemade vanilla custard ice cream, you’ll need a few simple yet essential ingredients. Each one plays a vital role in achieving that creamy, dreamy texture and rich flavor. Here’s what you’ll need:
- 2 cups heavy cream: This is the base of your ice cream, providing a rich and creamy texture.
- 1 cup whole milk: Whole milk adds creaminess while balancing the richness of the heavy cream.
- 1 cup granulated sugar: Sugar sweetens the mixture and helps create a smooth texture.
- 5 large egg yolks: Egg yolks are crucial for making a custard base, giving the ice cream its velvety consistency.
- 1 tablespoon pure vanilla extract: This adds a delightful vanilla flavor. For an even richer taste, consider using the seeds from a vanilla bean.
- Pinch of salt: A small amount of salt enhances the overall flavor of the ice cream.
These ingredients are easy to find at your local grocery store. When selecting your heavy cream and milk, opt for high-quality products for the best results. Fresh ingredients will make a noticeable difference in the final taste of your homemade vanilla custard ice cream. Now that you have everything you need, let’s move on to the preparation steps!
Step-by-Step Preparation of Homemade Vanilla Custard Ice Cream
Step 1: Gather Your Ingredients
Before you start, it’s important to have all your ingredients ready. This makes the process smoother and more enjoyable. Gather the following:
- 2 cups heavy cream
- 1 cup whole milk
- 1 cup granulated sugar
- 5 large egg yolks
- 1 tablespoon pure vanilla extract
- A pinch of salt
Having everything in one place will help you focus on creating that delicious ice cream without any interruptions. Now, let’s move on to the next step!
Step 2: Prepare the Custard Base
To make the custard base, start by combining the heavy cream, whole milk, and half of the sugar in a medium saucepan. Heat the mixture over medium heat, stirring occasionally. You want it to warm up, but don’t let it boil. Once it’s steaming, remove it from the heat.
In a separate bowl, whisk the egg yolks with the remaining sugar until the mixture is pale and slightly thickened. This step is crucial as it helps create that smooth texture in your ice cream.
Step 3: Infuse the Vanilla Flavor
Now, it’s time to add the vanilla flavor! Slowly pour the warm cream mixture into the bowl with the egg yolks while whisking constantly. This technique is called tempering, and it prevents the eggs from scrambling. Once combined, return the mixture to the saucepan.
Cook the mixture over low heat, stirring constantly until it thickens slightly. You’ll know it’s ready when it coats the back of a spoon. This step is essential for achieving that rich custard base.
Step 4: Chill the Mixture
After thickening, remove the saucepan from the heat and stir in the vanilla extract and a pinch of salt. Let the mixture cool at room temperature for about 30 minutes. Then, cover it and place it in the refrigerator for at least 4 hours, or overnight if you can wait! Chilling the mixture helps develop the flavors and ensures a smoother ice cream.
Step 5: Churn the Ice Cream
Once your custard base is chilled, it’s time to churn! Pour the mixture into your ice cream maker and churn according to the manufacturer’s instructions. This process usually takes about 20 to 25 minutes. You’ll notice the mixture becoming thicker and creamier as it churns.
If you don’t have an ice cream maker, don’t worry! You can still make ice cream by pouring the mixture into a shallow dish and placing it in the freezer. Stir it every 30 minutes until it reaches a creamy consistency.
Step 6: Freeze and Set
After churning, transfer the ice cream to an airtight container. Smooth the top with a spatula and cover it with a lid. Place it in the freezer for at least 4 hours to firm up. This final freezing step is crucial for achieving that perfect scoopable texture.
Once it’s set, your homemade vanilla custard ice cream is ready to enjoy! Scoop it into bowls or cones and get ready to indulge in a creamy, dreamy treat.
Variations of Homemade Vanilla Custard Ice Cream
Adding Mix-Ins to Your Ice Cream
One of the best parts of making homemade vanilla custard ice cream is the chance to customize it with your favorite mix-ins. These additions can elevate your ice cream experience and make each scoop unique. Here are some delightful mix-ins to consider:
- Chocolate Chips: Add semi-sweet or dark chocolate chips for a rich, sweet contrast to the creamy vanilla.
- Fresh Fruits: Chopped strawberries, blueberries, or bananas can add a refreshing burst of flavor.
- Nuts: Chopped almonds, walnuts, or pecans provide a satisfying crunch and nutty flavor.
- Cookie Crumbles: Crushed cookies, like Oreos or chocolate chip cookies, can create a fun texture and taste.
- Swirls of Sauce: Drizzle in caramel, chocolate, or fruit sauces during the last few minutes of churning for a beautiful marbled effect.
To add these mix-ins, simply fold them into the ice cream during the last few minutes of churning. This way, they’ll be evenly distributed without breaking apart. Feel free to get creative and mix and match to find your perfect combination!
Alternative Flavor Infusions
If you’re looking to switch things up, consider infusing your vanilla custard ice cream with different flavors. Here are some ideas to inspire your next batch:
- Chocolate: Add cocoa powder or melted chocolate to the custard base for a rich chocolate ice cream.
- Mint: Infuse the cream with fresh mint leaves before combining with the egg yolks for a refreshing mint chocolate chip ice cream.
- Coffee: Stir in brewed coffee or espresso for a delightful coffee-flavored treat.
- Coconut: Use coconut milk instead of some of the cream for a tropical twist, and add shredded coconut for texture.
- Fruit Purees: Blend fruits like mango or raspberry and swirl them into the ice cream for a fruity flavor explosion.
Experimenting with these alternative flavors can lead to exciting new ice cream experiences. Don’t hesitate to try different combinations and find what you love best!
Cooking Note for Homemade Vanilla Custard Ice Cream
When making homemade vanilla custard ice cream, a few cooking notes can help ensure your success. First, always use fresh ingredients. Fresh cream, milk, and eggs will significantly enhance the flavor and texture of your ice cream. If possible, opt for organic or locally sourced products for the best results.
Next, pay attention to the temperature of your ingredients. For the best outcome, your heavy cream and milk should be at room temperature before you start cooking. This helps them blend more easily with the egg yolks, creating a smoother custard base.
While cooking the custard, keep the heat low and stir constantly. This prevents the eggs from cooking too quickly and scrambling. If you notice any lumps forming, remove the mixture from the heat immediately and whisk vigorously until smooth.
Another important tip is to strain the custard mixture before chilling it. Pouring it through a fine-mesh sieve will catch any bits of cooked egg, ensuring a silky-smooth texture in your final ice cream. This step is especially crucial for achieving that luxurious mouthfeel that homemade vanilla custard ice cream is known for.
Lastly, patience is key! Allowing the mixture to chill thoroughly in the refrigerator will improve the flavor and texture of your ice cream. Rushing this step can lead to a less creamy result. So, take your time and enjoy the process of making this delightful treat!
Serving Suggestions for Homemade Vanilla Custard Ice Cream
Pairing with Toppings and Sauces
Once your homemade vanilla custard ice cream is ready, it’s time to serve it up! The beauty of this ice cream lies not only in its creamy texture but also in how you can enhance it with various toppings and sauces. Here are some delightful options to consider:
- Chocolate Sauce: Drizzle warm chocolate sauce over your ice cream for a rich, decadent treat. The contrast of warm and cold is simply irresistible!
- Caramel Sauce: A sweet, buttery caramel sauce adds a lovely sweetness that pairs perfectly with the vanilla flavor.
- Fresh Berries: Top your ice cream with fresh strawberries, raspberries, or blueberries for a burst of fruity freshness.
- Whipped Cream: A dollop of whipped cream adds a light and airy touch, making each bite even more delightful.
- Sprinkles: For a fun and festive look, sprinkle colorful jimmies or chocolate sprinkles on top.
Feel free to mix and match these toppings to create your perfect scoop. The combination of flavors and textures will elevate your homemade vanilla custard ice cream to a whole new level!
Creative Serving Ideas
Serving your homemade vanilla custard ice cream can be just as fun as making it! Here are some creative ideas to impress your family and friends:
- Ice Cream Sundaes: Create a classic sundae by layering your ice cream with toppings in a tall glass. Add a cherry on top for the finishing touch!
- Ice Cream Sandwiches: Scoop the ice cream between two cookies for a delicious ice cream sandwich. Chocolate chip or oatmeal cookies work wonderfully!
- Milkshakes: Blend a scoop of your ice cream with milk for a creamy milkshake. Add a splash of flavored syrup for an extra kick!
- Affogato: Pour a shot of hot espresso over a scoop of ice cream for a delightful Italian dessert known as affogato.
- Fruit Cups: Serve your ice cream in a bowl filled with fresh fruit for a refreshing and colorful dessert.
These serving ideas not only make your dessert visually appealing but also add layers of flavor that everyone will love. So, get creative and enjoy your homemade vanilla custard ice cream in style!
Tips for Perfect Homemade Vanilla Custard Ice Cream
Common Mistakes to Avoid
Making homemade vanilla custard ice cream can be a fun adventure, but there are a few common mistakes to watch out for. First, be careful not to overheat the custard mixture. If it boils, the eggs can scramble, ruining the smooth texture. Always keep the heat low and stir gently.
Another mistake is not chilling the mixture long enough. Skipping this step can lead to ice crystals forming in your ice cream, making it grainy instead of creamy. Aim for at least four hours in the fridge, or overnight if you can wait!
Also, avoid adding mix-ins too early. If you add them during the churning process, they may break apart or sink to the bottom. Instead, fold them in during the last few minutes of churning for the best results.
Lastly, don’t forget to strain your custard before chilling. This step catches any bits of cooked egg, ensuring a silky-smooth ice cream. Taking these precautions will help you create the perfect homemade vanilla custard ice cream every time!
Storage Tips for Ice Cream
Proper storage is key to keeping your homemade vanilla custard ice cream fresh and delicious. First, always use an airtight container to prevent freezer burn. This will help maintain the creamy texture and rich flavor of your ice cream.
When storing, leave some space at the top of the container. Ice cream expands as it freezes, and this extra space will prevent it from spilling over. If you have a lot of ice cream, consider dividing it into smaller containers for easier access.
To keep your ice cream at its best, try to minimize the number of times you open the container. Each time you do, warm air enters, which can affect the texture. If you notice any ice crystals forming on the surface, simply stir the ice cream before serving to restore its creaminess.
Homemade vanilla custard ice cream can be stored in the freezer for up to two weeks. However, for the best flavor and texture, enjoy it within the first week. With these storage tips, you can savor your delicious creation for days to come!
Breakdown of Time for Homemade Vanilla Custard Ice Cream
Prep Time
Preparing your homemade vanilla custard ice cream is a delightful process that requires some time. The prep time mainly involves gathering your ingredients and getting everything ready for cooking. This step usually takes about 15 to 20 minutes. During this time, you’ll measure out your heavy cream, milk, sugar, and egg yolks, ensuring you have everything you need at your fingertips. Having everything organized will make the cooking process smoother and more enjoyable.
Cooking Time
The cooking time for your custard base is approximately 20 to 30 minutes. This includes heating the cream and milk, whisking the egg yolks, and cooking the mixture until it thickens. It’s essential to keep an eye on the mixture and stir constantly to prevent any lumps from forming. This careful attention will ensure a silky-smooth custard that serves as the foundation for your ice cream.
Total Time
In total, you should expect to spend around 4 to 5 hours to make your homemade vanilla custard ice cream. This includes the prep time, cooking time, and the chilling time required for the custard base. After cooking, you’ll need to chill the mixture for at least 4 hours, or overnight for the best results. While this may seem like a long time, most of it is hands-off, allowing you to relax while the flavors develop. Once chilled, the churning and freezing process will take an additional 4 hours, making your total time commitment well worth the creamy, delicious reward!
Nutritional Information for Homemade Vanilla Custard Ice Cream
Calories and Macronutrients
Understanding the nutritional content of your homemade vanilla custard ice cream can help you enjoy it mindfully. Here’s a general breakdown of the calories and macronutrients per serving (1/2 cup):
- Calories: Approximately 250-300 calories
- Fat: 20-22 grams
- Saturated Fat: 12-14 grams
- Carbohydrates: 20-25 grams
- Sugar: 18-20 grams
- Protein: 4-5 grams
These values can vary based on the specific ingredients you use, such as the type of cream or sugar. While this ice cream is rich and indulgent, it’s important to enjoy it in moderation. The creamy texture and delightful flavor make it a special treat that can be savored on warm days or during celebrations.
Health Considerations
When indulging in homemade vanilla custard ice cream, it’s good to keep a few health considerations in mind. First, this ice cream is high in fat and sugar, which can contribute to your daily caloric intake. While fats are essential for a balanced diet, consuming them in moderation is key. Opting for smaller servings can help you enjoy the treat without overindulging.
Additionally, if you have dietary restrictions, consider making adjustments to the recipe. For instance, you can use low-fat milk or sugar substitutes to reduce calories. However, keep in mind that these changes may affect the texture and flavor of the ice cream.
Lastly, homemade ice cream allows you to control the ingredients, making it a better option than many store-bought varieties that may contain artificial flavors and preservatives. By making it at home, you can ensure that you’re enjoying a treat made with wholesome ingredients. So, while you indulge in this creamy delight, remember to balance it with a healthy diet and active lifestyle!
FAQs about Homemade Vanilla Custard Ice Cream
Can I use low-fat milk instead of heavy cream?
While you can use low-fat milk, it’s important to note that it will change the texture and creaminess of your homemade vanilla custard ice cream. Heavy cream is essential for that rich, velvety mouthfeel. If you want a lighter version, consider using a mix of low-fat milk and a small amount of heavy cream. This way, you can still enjoy a creamy texture while reducing the overall fat content.
How long can I store homemade ice cream?
You can store your homemade vanilla custard ice cream in the freezer for up to two weeks. However, for the best flavor and texture, it’s recommended to enjoy it within the first week. Make sure to keep it in an airtight container to prevent freezer burn. If you notice any ice crystals forming, simply stir the ice cream before serving to restore its creamy consistency.
What if I don’t have an ice cream maker?
No ice cream maker? No problem! You can still make delicious ice cream without one. Pour your chilled custard mixture into a shallow dish and place it in the freezer. Every 30 minutes, take it out and stir vigorously with a fork to break up any ice crystals. Repeat this process until the ice cream reaches a creamy consistency, usually about 2 to 3 hours. This method may take a bit longer, but it will still yield a delightful treat!
Can I make this ice cream dairy-free?
Yes, you can make a dairy-free version of homemade vanilla custard ice cream! Substitute the heavy cream and whole milk with full-fat coconut milk or almond milk. For the egg yolks, you can use a dairy-free thickener like cornstarch or arrowroot powder. Keep in mind that the flavor and texture will differ slightly, but you’ll still enjoy a delicious and creamy ice cream that everyone can savor!
Conclusion on Homemade Vanilla Custard Ice Cream
Recap of the Delightful Experience of Making Ice Cream at Home
Making homemade vanilla custard ice cream is not just about creating a delicious dessert; it’s an enjoyable experience that brings joy to your kitchen. From gathering fresh ingredients to watching the custard transform into a creamy delight, each step is filled with anticipation. The satisfaction of crafting your own ice cream is unmatched, especially when you share it with loved ones. You can take pride in knowing exactly what goes into your treat, ensuring it’s made with care and quality ingredients. Plus, the smiles on your family’s faces as they savor each scoop make all the effort worthwhile!
Encouragement to Experiment with Flavors
Now that you’ve mastered the art of homemade vanilla custard ice cream, don’t hesitate to get creative! The beauty of making ice cream at home lies in the endless possibilities for flavor combinations. Whether you want to add mix-ins like chocolate chips or try out unique infusions like mint or coffee, the choice is yours. Experimenting with flavors can lead to delightful surprises and new favorites. So, gather your ingredients, unleash your creativity, and embark on a flavorful journey. Your next batch of ice cream could be your best yet!
Relevant Recipes Link:
Craving more delightful ice cream recipes to sweeten your day and tantalize your taste buds? Try these irresistible options:
- Strawberry Vanilla Bean Ice Cream: A Summer Delight
- Sweet Strawberry Vanilla Bean Ice Cream: A Delightful Treat
- Creamy Baileys Ice Cream: A Must-Try Dessert
For more mouthwatering recipes and culinary inspiration, follow us on Pinterest!