Introduction to No-Bake Cookie Dough Bars
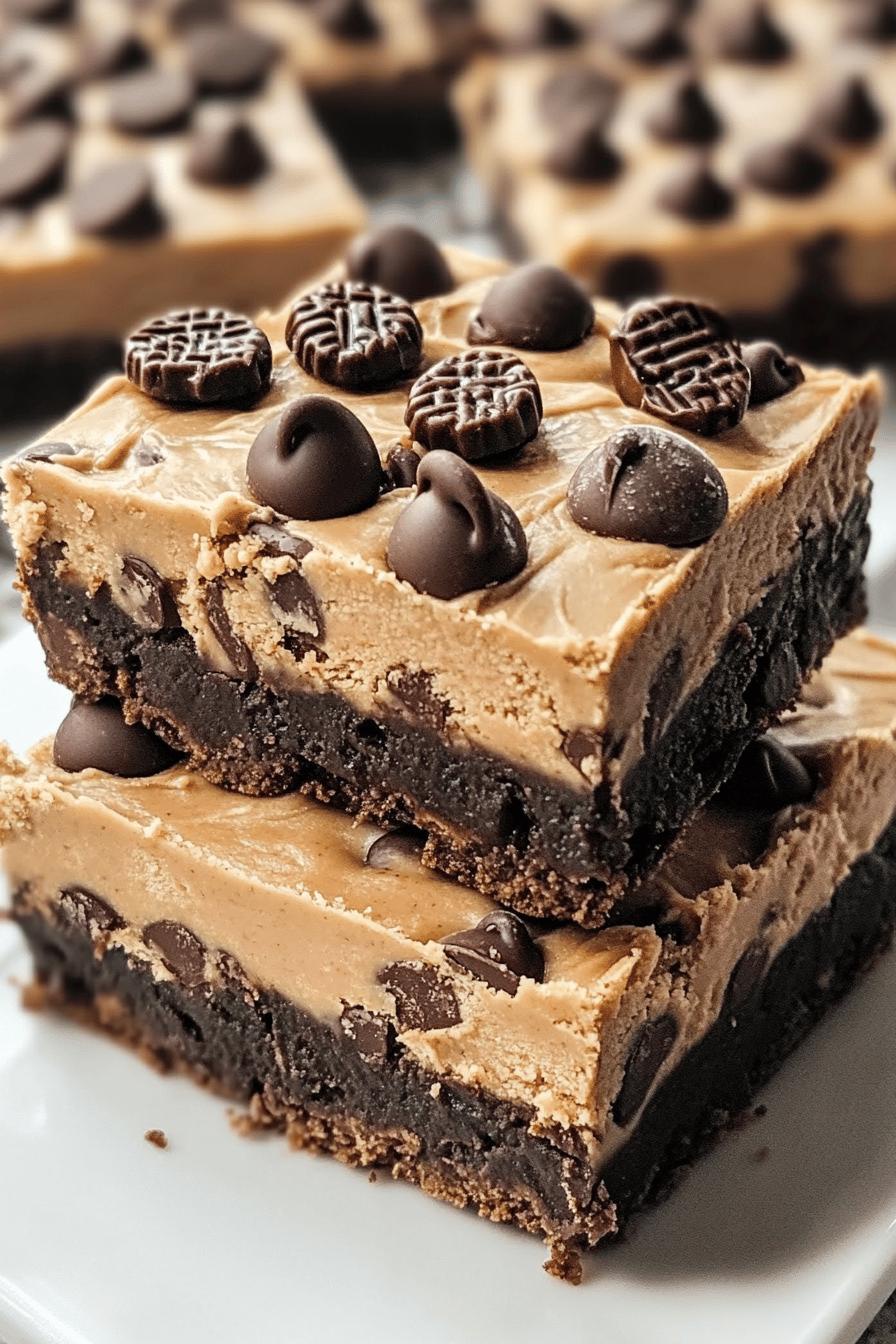
Are you craving something sweet but don’t want to heat up your kitchen? Look no further! No-bake cookie dough bars are the perfect solution. These delightful treats combine the rich flavors of cookie dough with a crunchy chocolate cookie base. Plus, they require no baking at all! Just mix, layer, and chill for a delicious dessert that everyone will love.
What Makes No-Bake Cookie Dough Bars Special?
No-bake cookie dough bars stand out for several reasons. First, they are incredibly easy to make. You don’t need to worry about preheating the oven or measuring baking times. Just gather your ingredients, and you’re ready to go! Second, the combination of textures is simply divine. The crunchy base pairs perfectly with the soft, chewy cookie dough layer. Finally, these bars are versatile. You can customize them with your favorite mix-ins, like nuts or dried fruit, to create a unique treat every time.
Why You Should Try This Recipe
If you’re looking for a quick and satisfying dessert, this recipe is a must-try. It’s perfect for parties, family gatherings, or even a cozy night in. Plus, kids love helping out in the kitchen, and this recipe is simple enough for them to join in. With just a few ingredients and minimal effort, you can whip up a batch of these no-bake cookie dough bars that will impress everyone. So, grab your mixing bowl and get ready to indulge in a sweet treat that’s sure to become a favorite!
Ingredients for No-Bake Cookie Dough Bars
To create these delicious no-bake cookie dough bars, you’ll need a few simple ingredients. Each one plays a vital role in achieving that perfect balance of flavor and texture. Here’s what you’ll need:
- For the Chocolate Cookie Base:
- 1 ½ cups chocolate cookie crumbs (you can use store-bought or crush your favorite chocolate cookies)
- ½ cup unsalted butter, melted
- 2 tablespoons granulated sugar
- For the Cookie Dough Layer:
- 1 cup all-purpose flour (heat-treated for safety)
- ½ cup unsalted butter, softened
- ¾ cup brown sugar, packed
- ¼ cup granulated sugar
- 1 teaspoon vanilla extract
- 2 tablespoons milk (or dairy-free alternative)
- ½ cup chocolate chips
- ¼ cup mini cookies (for topping)
These ingredients come together to create a delightful treat that’s both rich and satisfying. The chocolate cookie base provides a crunchy foundation, while the cookie dough layer adds a soft, sweet contrast. Feel free to get creative with your toppings or mix-ins to make these bars your own!
Preparation of No-Bake Cookie Dough Bars
Now that you have all your ingredients ready, it’s time to prepare your no-bake cookie dough bars! This process is simple and fun. Just follow these easy steps to create a delicious treat that everyone will love.
Step 1: Prepare the Chocolate Cookie Base
First, you’ll want to make the chocolate cookie base. Start by placing the chocolate cookie crumbs in a mixing bowl. Next, pour in the melted butter and add the granulated sugar. Mix everything together until the crumbs are well-coated and the mixture resembles wet sand. This will help the base hold together nicely.
Once mixed, press the cookie mixture firmly into the bottom of a lined 8×8-inch baking dish. Use the back of a measuring cup or your hands to ensure it’s packed tightly. This step is crucial for a sturdy base that won’t crumble when you cut the bars later.
Step 2: Make the Cookie Dough Layer
Now, let’s move on to the cookie dough layer! In a separate bowl, cream together the softened butter, brown sugar, and granulated sugar until it’s light and fluffy. This should take about 2-3 minutes. Then, add the vanilla extract and milk, mixing until combined.
Next, gradually add the heat-treated flour to the mixture. Stir until everything is well combined. Finally, fold in the chocolate chips. This cookie dough layer is what makes these bars so irresistible!
Step 3: Assemble the Bars
With both layers ready, it’s time to assemble your bars. Spread the cookie dough mixture evenly over the chocolate cookie base. Use a spatula to smooth it out, ensuring it covers the base completely. For an extra touch, sprinkle the mini cookies on top of the cookie dough layer. This adds a delightful crunch and makes the bars look even more appealing!
Step 4: Chill and Set the Bars
Finally, it’s time to chill your no-bake cookie dough bars. Cover the baking dish with plastic wrap or aluminum foil and place it in the refrigerator. Let the bars chill for at least 2 hours, or until they are firm. This step is essential for achieving the perfect texture. Once set, you can cut them into squares and enjoy!
And there you have it! Your no-bake cookie dough bars are ready to be devoured. They’re perfect for sharing or keeping all to yourself. Enjoy every delicious bite!
Variation of No-Bake Cookie Dough Bars
If you love the idea of no-bake cookie dough bars but want to switch things up, you’re in luck! There are many ways to customize this recipe. Whether you want to try different flavors or accommodate dietary needs, these variations will keep your taste buds excited.
Alternative Ingredients for Different Flavors
One of the best parts about no-bake cookie dough bars is their versatility. You can easily swap out ingredients to create new flavors. Here are some ideas:
- Peanut Butter Cookie Dough: Replace half of the butter in the cookie dough layer with creamy peanut butter. This adds a rich, nutty flavor that pairs wonderfully with chocolate.
- Mint Chocolate Chip: Add a few drops of peppermint extract to the cookie dough layer. Then, mix in mint chocolate chips for a refreshing twist.
- Oreo Cookie Dough: Use crushed Oreo cookies instead of chocolate cookie crumbs for the base. This will give your bars a delicious cookies-and-cream flavor.
- Caramel Swirl: Drizzle caramel sauce over the cookie dough layer before chilling. This adds a sweet, gooey surprise in every bite!
Feel free to experiment with your favorite flavors and ingredients. The possibilities are endless, and you might just discover a new favorite combination!
Dietary Modifications (Vegan, Gluten-Free)
Making no-bake cookie dough bars that fit specific dietary needs is easier than you think. Here are some simple modifications:
- Vegan Version: Substitute the butter with coconut oil or a vegan butter alternative. Use dairy-free chocolate chips and ensure your cookie crumbs are vegan-friendly.
- Gluten-Free Version: Replace all-purpose flour with a gluten-free flour blend. Make sure your chocolate cookie crumbs are also gluten-free. Many brands offer gluten-free cookies that work perfectly for the base.
These modifications allow everyone to enjoy the deliciousness of no-bake cookie dough bars, regardless of dietary restrictions. So, go ahead and make these treats your own!
Cooking Note for No-Bake Cookie Dough Bars
When it comes to making no-bake cookie dough bars, a few cooking notes can help ensure your treats turn out perfectly every time. These tips will guide you through the process and enhance your overall experience.
First, always remember to heat-treat your flour. This step is crucial for safety, as raw flour can contain harmful bacteria. To heat-treat flour, simply spread it on a baking sheet and bake it at 350°F (175°C) for about 5 minutes. Let it cool before using it in your recipe.
Next, make sure your butter is at the right temperature. For the cookie dough layer, softened butter is key. It should be soft enough to cream with the sugars but not melted. If you forget to take it out of the fridge, you can cut it into small pieces and let it sit at room temperature for about 15 minutes.
Additionally, when pressing the chocolate cookie base into the baking dish, be firm but gentle. You want it to be compact, but avoid overworking it, as this can make the base too dense. A well-pressed base will hold together nicely when you cut the bars.
Lastly, patience is essential! Allow the bars to chill for the full recommended time. This helps the layers set properly, making them easier to cut and ensuring the best texture. If you’re in a hurry, you can place them in the freezer for about 30 minutes, but be cautious not to freeze them solid.
By following these cooking notes, you’ll create no-bake cookie dough bars that are not only delicious but also visually appealing. Enjoy the process and the delightful results!
Serving Suggestions for No-Bake Cookie Dough Bars
Once your no-bake cookie dough bars are ready, it’s time to think about how to serve them! These bars are not only delicious but also versatile. Here are some great serving suggestions to elevate your dessert experience.
Perfect Pairings with Beverages
Pairing your no-bake cookie dough bars with the right beverages can enhance their flavor and make for a delightful treat. Here are some ideas:
- Milk: A classic choice! The creaminess of milk complements the sweetness of the bars perfectly. You can serve it cold or warm for a cozy touch.
- Coffee: For adults, a cup of coffee adds a nice contrast to the sweetness. The rich flavors of coffee balance the dessert beautifully.
- Hot Chocolate: If you’re in the mood for something extra indulgent, serve your bars with a warm cup of hot chocolate. Top it with whipped cream for a special treat!
- Tea: A light herbal or chai tea can be a refreshing option. The spices in chai can enhance the flavors of the cookie dough bars.
These beverage pairings will not only satisfy your sweet tooth but also create a delightful experience for your taste buds!
Presentation Ideas for Special Occasions
When it comes to serving no-bake cookie dough bars, presentation matters! Here are some creative ideas to make your dessert stand out:
- Layered Dessert Cups: Instead of cutting the bars, layer the cookie dough mixture and chocolate cookie crumbs in clear cups. Top with whipped cream and a sprinkle of mini cookies for a fun twist.
- Decorative Platter: Arrange the cut bars on a decorative platter. Add fresh berries or mint leaves around the bars for a pop of color and freshness.
- Gift Boxes: If you’re sharing these treats, consider packaging them in cute gift boxes. Tie with a ribbon for a lovely presentation that’s perfect for parties or as a thoughtful gift.
- Chocolate Drizzle: Drizzle melted chocolate over the top of the bars before serving. This adds an elegant touch and makes them even more irresistible!
With these serving suggestions, your no-bake cookie dough bars will not only taste amazing but also look fantastic. Enjoy sharing these delightful treats with family and friends!
Tips for Making the Best No-Bake Cookie Dough Bars
Creating the perfect no-bake cookie dough bars is all about attention to detail. With a few helpful tips, you can avoid common pitfalls and ensure your treats turn out delicious every time. Here are some essential tips to keep in mind while making your bars.
Common Mistakes to Avoid
Even though this recipe is simple, there are a few mistakes that can affect the final result. Here’s what to watch out for:
- Skipping the Heat-Treatment: Always heat-treat your flour! This step is crucial for safety. Raw flour can harbor bacteria, so don’t skip it.
- Using Melted Butter: For the cookie dough layer, make sure your butter is softened, not melted. Melted butter can make the dough too runny.
- Not Packing the Base Firmly: When pressing the chocolate cookie base into the dish, be sure to pack it tightly. A loose base can crumble when you cut the bars.
- Rushing the Chilling Time: Patience is key! Allow the bars to chill for the full time recommended. This helps them set properly and makes cutting easier.
By avoiding these common mistakes, you’ll be on your way to making the best no-bake cookie dough bars that everyone will love!
Storage Tips for Freshness
To keep your no-bake cookie dough bars fresh and delicious, proper storage is essential. Here are some tips to help you maintain their quality:
- Refrigerate: Store the bars in an airtight container in the refrigerator. This will keep them fresh for up to one week.
- Freezing: If you want to enjoy them later, you can freeze the bars. Wrap them tightly in plastic wrap and then place them in a freezer-safe container. They can last for up to three months in the freezer.
- Thawing: When you’re ready to enjoy your frozen bars, simply transfer them to the refrigerator for a few hours to thaw. Avoid microwaving, as this can change their texture.
- Keep Toppings Separate: If you’ve added toppings like mini cookies or chocolate drizzle, consider storing them separately. This will prevent them from getting soggy.
By following these storage tips, you can ensure that your no-bake cookie dough bars stay fresh and tasty for as long as possible. Enjoy your delicious treats whenever the craving strikes!
Breakdown of Time for No-Bake Cookie Dough Bars
Understanding the time needed to make no-bake cookie dough bars can help you plan your dessert-making session. Here’s a simple breakdown of the time involved in preparing these delicious treats.
Prep Time
The prep time for no-bake cookie dough bars is quite short. You’ll need about 15-20 minutes to gather your ingredients and mix the layers. This includes:
- Measuring and preparing the chocolate cookie base.
- Making the cookie dough layer.
- Assembling the bars in the baking dish.
With everything ready, you’ll be amazed at how quickly you can whip up this delightful dessert!
Cooking Time
Since these bars are no-bake, there’s no actual cooking time involved. However, you will need to chill the bars to set them properly. This chilling time is crucial for achieving the right texture. You should allow at least 2 hours for the bars to chill in the refrigerator. If you’re in a hurry, you can place them in the freezer for about 30 minutes, but be careful not to freeze them solid.
Total Time
In total, you can expect to spend about 2 hours and 20 minutes from start to finish. This includes:
- 15-20 minutes for prep.
- 2 hours for chilling.
With just a little bit of time and effort, you’ll have a batch of no-bake cookie dough bars ready to enjoy. They’re perfect for any occasion, and the best part is, you didn’t even have to turn on the oven!
Nutritional Information for No-Bake Cookie Dough Bars
Understanding the nutritional content of your no-bake cookie dough bars can help you enjoy them in moderation. Here’s a breakdown of the key nutritional components for one serving (assuming the recipe yields 16 bars):
Calories
Each no-bake cookie dough bar contains approximately 200 calories. This makes them a satisfying treat without being overly indulgent. The calorie count can vary slightly based on the specific ingredients you use, such as the type of chocolate chips or the brand of cookie crumbs. Enjoying one bar as a dessert can fit nicely into a balanced diet!
Protein
In terms of protein, each bar provides about 2 grams. While this isn’t a high-protein snack, it does contribute to your daily intake. If you’re looking to boost the protein content, consider adding nuts or using protein-enriched chocolate chips in your recipe. This way, you can enjoy a delicious treat while also supporting your nutritional goals.
Sodium
Each bar contains roughly 100 milligrams of sodium. This amount is relatively low, making these bars a great option for those watching their sodium intake. However, if you’re using salted butter or certain brands of cookie crumbs, be mindful of the sodium levels. Always check the labels to ensure you’re staying within your dietary preferences.
By keeping these nutritional facts in mind, you can enjoy your no-bake cookie dough bars guilt-free. They’re a delightful treat that can be part of a balanced lifestyle. So go ahead, indulge in a bar or two, and savor every bite!
FAQs about No-Bake Cookie Dough Bars
Can I freeze No-Bake Cookie Dough Bars?
Absolutely! Freezing no-bake cookie dough bars is a great way to enjoy them later. To freeze, wrap the bars tightly in plastic wrap and then place them in a freezer-safe container. They can last for up to three months in the freezer. When you’re ready to enjoy them, simply transfer the bars to the refrigerator for a few hours to thaw. This way, you can have a delicious treat ready whenever the craving strikes!
How long do No-Bake Cookie Dough Bars last?
No-bake cookie dough bars can last up to one week when stored properly in an airtight container in the refrigerator. If you want to keep them fresh for a longer time, consider freezing them. Just remember to wrap them well to prevent freezer burn. This way, you can enjoy your tasty bars even after a week!
Can I use different types of chocolate chips?
Yes, you can definitely use different types of chocolate chips! Feel free to experiment with semi-sweet, dark, or even white chocolate chips. You can also try flavored chips, like peanut butter or butterscotch, for a fun twist. Mixing different types of chocolate can add a unique flavor to your no-bake cookie dough bars, making them even more delightful!
What can I substitute for the butter in the recipe?
If you need a substitute for butter, there are several options you can use. For a vegan version, try using coconut oil or a plant-based butter alternative. If you’re looking for a healthier option, unsweetened applesauce can work as a substitute, though it may change the texture slightly. Just keep in mind that the flavor might be a bit different, but your bars will still be delicious!
Conclusion on No-Bake Cookie Dough Bars
Final Thoughts and Encouragement to Try the Recipe
In conclusion, no-bake cookie dough bars are a delightful treat that everyone can enjoy. They are easy to make, require no baking, and can be customized to suit your taste. Whether you’re preparing them for a special occasion or just a sweet snack at home, these bars are sure to impress.
With their rich flavors and satisfying textures, it’s hard to resist just one bite! Plus, the joy of making these bars is something you can share with family and friends. So, gather your ingredients, roll up your sleeves, and dive into this fun and delicious recipe.
Don’t forget to experiment with different flavors and toppings to make these bars uniquely yours. Whether you stick to the classic version or try out new variations, you’re bound to create something special. So, what are you waiting for? Get started on your no-bake cookie dough bars today, and enjoy every scrumptious bite!