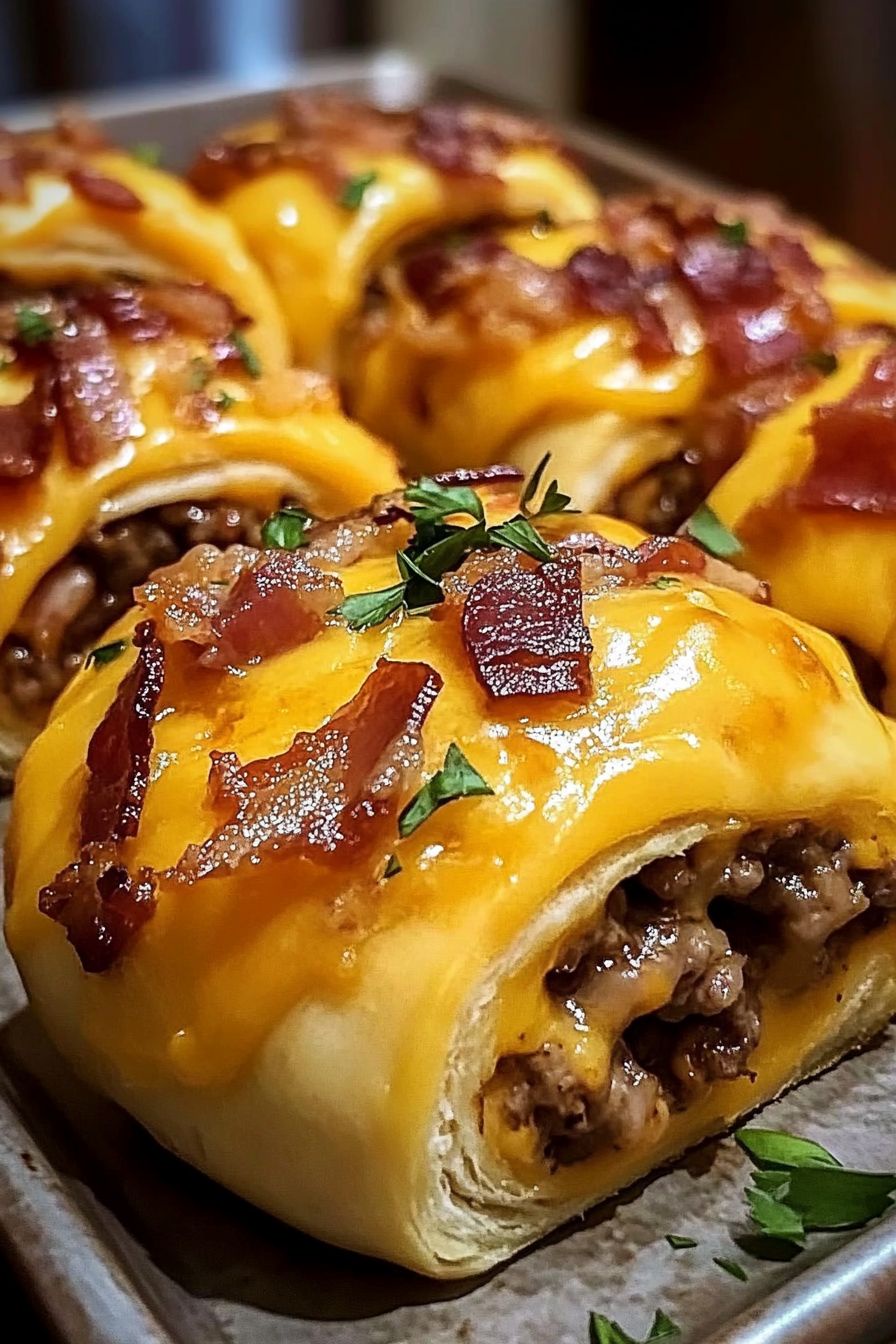
Introduction to Garlic Butter Bacon Cheeseburger Rollups
Are you ready to take your snacking game to the next level? Look no further than Garlic Butter Bacon Cheeseburger Rollups! These delightful treats combine the best flavors of a classic cheeseburger into a fun, bite-sized snack. Imagine crispy bacon, melted cheese, and juicy beef all wrapped in a buttery dough. It’s a flavor explosion that will leave your taste buds dancing with joy!
What Makes Garlic Butter Bacon Cheeseburger Rollups Special?
What sets these rollups apart? First, it’s the combination of ingredients. The crispy bacon adds a savory crunch, while the gooey cheese brings a creamy texture. The beef provides a hearty base, making each bite satisfying. But the real star is the garlic butter topping. It adds a rich, aromatic flavor that elevates the entire dish. Plus, they are easy to make, which means you can whip them up in no time!
The Perfect Snack for Any Occasion
Whether you’re hosting a party, enjoying a family movie night, or just craving a tasty snack, Garlic Butter Bacon Cheeseburger Rollups are perfect for any occasion. They are great as appetizers or even as a main dish. Serve them at your next gathering, and watch as they disappear in minutes! Everyone loves a good cheeseburger, and these rollups make it easy to enjoy that classic flavor in a fun new way.
So, gather your ingredients and get ready to impress your friends and family with this delicious recipe. You won’t regret it!
Ingredients for Garlic Butter Bacon Cheeseburger Rollups
To create these mouthwatering Garlic Butter Bacon Cheeseburger Rollups, you’ll need a few simple ingredients. Each one plays a vital role in delivering that classic cheeseburger flavor. Here’s what you’ll need:
- 1 pound ground beef
- 8 slices of crispy bacon, chopped
- 1 cup shredded cheddar cheese
- 1 package of refrigerated crescent roll dough
- 4 tablespoons unsalted butter, melted
- 2 cloves garlic, minced
- 1 teaspoon onion powder
- 1 teaspoon Worcestershire sauce
- Salt and pepper to taste
- Optional: chopped fresh parsley for garnish
These ingredients come together to create a delightful mix of flavors and textures. The ground beef and bacon provide a savory base, while the cheddar cheese adds that gooey goodness we all love. The crescent roll dough wraps everything up perfectly, making each bite a delicious experience.
Don’t forget the garlic butter! It’s the finishing touch that brings everything together. The aroma of garlic and butter will fill your kitchen, making it hard to resist sneaking a taste before they’re even done baking!
Now that you have your ingredients ready, let’s move on to the next step: preparing the filling!
Step-by-Step Preparation of Garlic Butter Bacon Cheeseburger Rollups
Now that you have all your ingredients ready, it’s time to dive into the fun part: preparing your Garlic Butter Bacon Cheeseburger Rollups! Follow these simple steps to create a delicious snack that everyone will love.
Step 1: Preparing the Filling
First, let’s get that tasty filling ready. Start by cooking the ground beef in a skillet over medium heat. Break it apart with a spatula as it cooks. You want it to be browned and fully cooked, which usually takes about 5 to 7 minutes. Once it’s done, drain any excess fat.
Next, add the chopped bacon to the skillet. If you haven’t cooked the bacon yet, you can do it now. Just fry it until it’s crispy, then chop it into small pieces. Mix the bacon with the beef in the skillet. Now, sprinkle in the onion powder, Worcestershire sauce, salt, and pepper. Stir everything together until well combined. Finally, remove the skillet from heat and let the mixture cool for a few minutes.
Step 2: Assembling the Rollups
Once your filling is ready, it’s time to assemble the rollups! Preheat your oven to 375°F (190°C). While the oven heats up, take the package of crescent roll dough and unroll it on a clean surface. You’ll see that it’s divided into triangles.
Take a spoonful of the beef and bacon mixture and place it at the wide end of each triangle. Add a sprinkle of shredded cheddar cheese on top of the filling. Now, roll the dough from the wide end to the point, wrapping it around the filling. Make sure to pinch the edges to seal them well. This will help keep all that deliciousness inside!
Step 3: Baking the Rollups
Now that your rollups are assembled, it’s time to bake them! Place the rollups on a baking sheet lined with parchment paper. Make sure to leave some space between each rollup so they can puff up nicely while baking. Pop them in the preheated oven and bake for about 12 to 15 minutes, or until they are golden brown and flaky.
As they bake, your kitchen will fill with the mouthwatering aroma of garlic and cheese. It’s hard to resist sneaking a taste, but hold on just a bit longer!
Step 4: Adding the Garlic Butter Topping
While the rollups are baking, let’s prepare the garlic butter topping. In a small bowl, mix the melted butter with the minced garlic. Once the rollups are out of the oven, brush this delicious garlic butter mixture over the top of each rollup. This step adds an extra layer of flavor that you won’t want to skip!
For a finishing touch, you can sprinkle some chopped fresh parsley on top for a pop of color and freshness. Now, your Garlic Butter Bacon Cheeseburger Rollups are ready to be served!
Variations of Garlic Butter Bacon Cheeseburger Rollups
If you’re looking to mix things up a bit, there are plenty of variations you can try with Garlic Butter Bacon Cheeseburger Rollups. Whether you want to cater to different dietary preferences or simply experiment with flavors, these ideas will keep your taste buds excited!
Vegetarian Options
For those who prefer a meat-free option, you can easily create a delicious vegetarian version of these rollups. Instead of ground beef and bacon, use a combination of sautéed mushrooms, bell peppers, and onions. These veggies will add a savory depth to your filling. You can also include black beans or lentils for added protein.
To keep the cheeseburger flavor, add your favorite cheese, like mozzarella or pepper jack. The garlic butter topping will still work perfectly, giving your vegetarian rollups that rich, buttery flavor. This way, everyone can enjoy a tasty snack, regardless of their dietary choices!
Different Cheese Choices
Cheese lovers rejoice! You can customize the cheese in your Garlic Butter Bacon Cheeseburger Rollups to suit your taste. While cheddar is a classic choice, feel free to experiment with other types of cheese. For a sharper flavor, try using gouda or aged cheddar. If you prefer something creamier, cream cheese or a blend of cheeses can work wonders.
For a spicy kick, consider adding pepper jack cheese or even crumbled blue cheese. Mixing different cheeses can create a delightful flavor profile that will surprise your guests. The possibilities are endless, so don’t hesitate to get creative!
With these variations, you can enjoy Garlic Butter Bacon Cheeseburger Rollups in new and exciting ways. Whether you’re catering to vegetarians or trying out different cheeses, these rollups will always be a hit!
Cooking Note for Garlic Butter Bacon Cheeseburger Rollups
When it comes to making Garlic Butter Bacon Cheeseburger Rollups, a few cooking notes can help ensure your rollups turn out perfectly every time. Here are some tips to keep in mind:
- Use Fresh Ingredients: Fresh ingredients make a big difference in flavor. Opt for fresh garlic and high-quality bacon for the best results. Fresh herbs can also enhance the taste.
- Don’t Overfill: While it’s tempting to pack in a lot of filling, be careful not to overfill the rollups. This can cause them to burst open while baking. A spoonful of filling is usually just right!
- Check Dough Expiration: Always check the expiration date on your crescent roll dough. Using fresh dough ensures that your rollups will rise and bake properly.
- Adjust Baking Time: Every oven is different. Keep an eye on your rollups as they bake. If they’re not golden brown after 15 minutes, give them a few extra minutes. Just be sure to watch closely to avoid burning.
- Experiment with Seasonings: Feel free to add your favorite seasonings to the beef mixture. A dash of smoked paprika or a sprinkle of chili powder can add a unique twist to the flavor.
By following these cooking notes, you’ll be well on your way to creating delicious Garlic Butter Bacon Cheeseburger Rollups that are sure to impress. Happy cooking!
Serving Suggestions for Garlic Butter Bacon Cheeseburger Rollups
Now that your Garlic Butter Bacon Cheeseburger Rollups are baked to perfection, it’s time to think about how to serve them. These rollups are not only delicious on their own, but they also pair wonderfully with various dips and sauces. Let’s explore some tasty options!
Pairing with Dips and Sauces
Dips and sauces can elevate your Garlic Butter Bacon Cheeseburger Rollups to a whole new level. Here are some fantastic options to consider:
- Ketchup: A classic choice! Ketchup adds a sweet and tangy flavor that complements the savory rollups.
- Mustard: For a bit of zing, serve your rollups with yellow or Dijon mustard. It adds a nice kick!
- Ranch Dressing: Creamy ranch dressing is a crowd favorite. Its coolness balances the warm, cheesy rollups perfectly.
- BBQ Sauce: If you love smoky flavors, BBQ sauce is a great option. It adds a rich, sweet taste that pairs well with the bacon.
- Cheese Sauce: For the ultimate cheesy experience, drizzle some warm cheese sauce over your rollups. It’s a cheesy dream come true!
Feel free to mix and match these dips to find your favorite combination. Your guests will love having options to choose from!
Ideal Serving Sizes
When it comes to serving Garlic Butter Bacon Cheeseburger Rollups, portion sizes can vary based on the occasion. Here are some guidelines to help you decide:
- As Appetizers: If you’re serving these rollups as appetizers at a party, plan for about 2 to 3 rollups per person. This allows guests to enjoy a few bites without filling up too quickly.
- As a Main Dish: If you’re making these rollups for lunch or dinner, consider serving 4 to 5 rollups per person. Pair them with a side salad or some veggies for a complete meal.
- For Kids: Kids usually enjoy smaller portions. Aim for 1 to 2 rollups per child, depending on their appetite.
By keeping these serving suggestions in mind, you can ensure that everyone enjoys their Garlic Butter Bacon Cheeseburger Rollups just the way they like them. Happy serving!
Tips for Perfect Garlic Butter Bacon Cheeseburger Rollups
To ensure your Garlic Butter Bacon Cheeseburger Rollups turn out perfectly every time, here are some handy tips. These suggestions will help you store, reheat, and enjoy your rollups to the fullest!
Storage Tips
Storing your Garlic Butter Bacon Cheeseburger Rollups properly is key to keeping them fresh and tasty. Here’s how to do it:
- Cool Completely: Before storing, let the rollups cool completely. This prevents condensation, which can make them soggy.
- Use Airtight Containers: Place the cooled rollups in an airtight container. This helps keep them fresh and prevents them from drying out.
- Refrigerate: Store the rollups in the refrigerator if you plan to eat them within a few days. They can last up to 3 days in the fridge.
- Freeze for Longer Storage: If you want to keep them longer, consider freezing the rollups. Wrap each rollup in plastic wrap and then place them in a freezer-safe bag. They can last up to 2 months in the freezer.
Reheating Instructions
When it’s time to enjoy your leftover Garlic Butter Bacon Cheeseburger Rollups, reheating them properly will help maintain their deliciousness. Here’s how:
- Oven Method: Preheat your oven to 350°F (175°C). Place the rollups on a baking sheet and cover them with aluminum foil. Bake for about 10-15 minutes, or until heated through. This method keeps them crispy!
- Microwave Method: If you’re in a hurry, you can use the microwave. Place a rollup on a microwave-safe plate and cover it with a damp paper towel. Heat for about 30 seconds to 1 minute, checking to ensure it’s warm throughout. Note that this method may make the rollups a bit softer.
- Air Fryer Method: For a quick and crispy option, use an air fryer. Preheat the air fryer to 350°F (175°C) and place the rollups in a single layer. Heat for about 5-7 minutes, checking to ensure they are heated through.
By following these storage and reheating tips, you can enjoy your Garlic Butter Bacon Cheeseburger Rollups even after the first serving. They’ll taste just as good the second time around!
Breakdown of Time for Garlic Butter Bacon Cheeseburger Rollups
When it comes to making Garlic Butter Bacon Cheeseburger Rollups, knowing how much time you need can help you plan better. Here’s a simple breakdown of the time required for each step of the process. This way, you can enjoy your delicious rollups without any surprises!
Prep Time
The prep time for these rollups is quite manageable. You’ll need about 15 to 20 minutes to gather your ingredients and prepare the filling. This includes cooking the ground beef and bacon, mixing in the seasonings, and assembling the rollups. If you have everything ready, you can whip them up even faster!
Cooking Time
Once your rollups are assembled, the cooking time is approximately 12 to 15 minutes. During this time, they will bake to a golden brown perfection. Keep an eye on them to ensure they don’t overcook. The aroma will be hard to resist, but patience is key!
Total Time
In total, you can expect to spend around 30 to 35 minutes from start to finish. This includes both prep and cooking time. With such a quick turnaround, Garlic Butter Bacon Cheeseburger Rollups are perfect for a last-minute snack or a fun appetizer for guests. You’ll be enjoying these tasty treats in no time!
Nutritional Information for Garlic Butter Bacon Cheeseburger Rollups
Understanding the nutritional content of your Garlic Butter Bacon Cheeseburger Rollups can help you enjoy them even more. Here’s a breakdown of the key nutritional components you can expect in each rollup. Keep in mind that these values can vary based on the specific ingredients you use and the portion sizes.
Calories
Each Garlic Butter Bacon Cheeseburger Rollup contains approximately 250 to 300 calories. This makes them a satisfying snack or appetizer without being overly heavy. If you’re watching your calorie intake, consider enjoying one or two rollups alongside a fresh salad or some veggies for a balanced meal.
Protein
These rollups are a great source of protein, thanks to the ground beef and bacon. Each rollup provides about 12 to 15 grams of protein. This protein content helps keep you feeling full and satisfied, making them a perfect choice for a quick snack or a hearty appetizer.
Sodium
One thing to keep in mind is the sodium content. Each rollup contains around 500 to 600 milligrams of sodium. This is primarily due to the bacon and any added seasonings. If you’re watching your sodium intake, consider using low-sodium bacon or reducing the amount of added salt in the filling.
By being aware of the nutritional information, you can enjoy your Garlic Butter Bacon Cheeseburger Rollups while keeping your dietary goals in mind. They’re a delicious treat that can fit into a balanced diet when enjoyed in moderation!
FAQs about Garlic Butter Bacon Cheeseburger Rollups
Can I make Garlic Butter Bacon Cheeseburger Rollups ahead of time?
Absolutely! You can prepare Garlic Butter Bacon Cheeseburger Rollups ahead of time. Simply assemble the rollups and place them on a baking sheet. Cover them with plastic wrap and store them in the refrigerator for up to 24 hours. When you’re ready to bake, just remove the wrap and pop them in the oven. This makes them a great option for parties or gatherings!
What can I substitute for bacon in Garlic Butter Bacon Cheeseburger Rollups?
If you’re looking for a bacon substitute, there are several tasty options! You can use turkey bacon or even pancetta for a different flavor. For a vegetarian option, consider using sautéed mushrooms or smoked tempeh. These alternatives will still give you that savory taste without the pork. Feel free to get creative with your choices!
How do I know when the rollups are done baking?
Knowing when your rollups are done is easy! Keep an eye on them as they bake. They should turn a lovely golden brown color and look flaky. You can also check the internal temperature with a food thermometer. It should reach at least 165°F (74°C) to ensure the filling is fully cooked. If they look delicious and smell amazing, they’re likely ready to enjoy!
Can I freeze Garlic Butter Bacon Cheeseburger Rollups?
Yes, you can freeze Garlic Butter Bacon Cheeseburger Rollups! To do this, wrap each rollup tightly in plastic wrap and place them in a freezer-safe bag. They can be stored in the freezer for up to 2 months. When you’re ready to eat them, simply thaw them in the refrigerator overnight and bake as directed. This makes for a quick and easy snack whenever you need it!
Conclusion on Garlic Butter Bacon Cheeseburger Rollups
In conclusion, Garlic Butter Bacon Cheeseburger Rollups are a delightful treat that brings together the best flavors of a classic cheeseburger in a fun and easy-to-eat format. Whether you’re hosting a party, enjoying a family movie night, or simply craving a savory snack, these rollups are sure to impress. With their crispy bacon, gooey cheese, and juicy beef wrapped in buttery dough, they offer a satisfying bite that everyone will love.
Final Thoughts on This Delicious Snack
Not only are these rollups delicious, but they are also incredibly versatile. You can easily customize them to suit your taste preferences or dietary needs. From vegetarian options to different cheese choices, the possibilities are endless. Plus, with simple preparation and cooking steps, you can whip them up in no time!
So, why not give Garlic Butter Bacon Cheeseburger Rollups a try? They are perfect for any occasion and are guaranteed to be a hit with family and friends. Enjoy the rich flavors and delightful textures, and watch as they disappear from the plate in no time. Happy cooking!